Centos7搭建神器openvpn

目的

OpenVPN是一个开源的应用程序,它允许您通过公共互联网创建一个安全的专用网络。OpenVPN实现一个虚拟专用网(VPN)来创建一个安全连接。OpenVPN使用OpenSSL库提供加密,它提供了几种身份验证机制,如基于证书的、预共享密钥和用户名/密码身份验证。本文详细介绍了OpenVPN搭建过程,并利用pam_sqlite3插件实现用户认证;通过openvpn_web进行用户管理与日志系统。

环境

服务端:CentOS7.x

客户端:Windows10

服务端安装

安装openvpn

1
2
3
4
5
6
7
8
9
10
#临时关闭selinux
setenforce 0
#配置文件永久关闭 修改/etc/selinux/config 文件
SELINUX=disabled

#添加epel yum源
wget -O /etc/yum.repos.d/epel-7.repo http://mirrors.aliyun.com/repo/epel-7.repo

#yum安装包
yum install openvpn -y

配置EasyRSA

1
2
3
4
5
6
#下载EasyRSA 3.0.7
cd /opt/
wget https://github.com/OpenVPN/easy-rsa/releases/download/v3.0.7/EasyRSA-3.0.7.tgz
tar xf EasyRSA-3.0.7.tgz
cp -r easyRSA-3.0.7/ /etc/openvpn/easy-rsa3
cp /etc/openvpn/easy-rsa3/vars.example /etc/openvpn/easy-rsa3/vars

创建相关证书和秘钥

1
2
3
4
5
6
7
8
9
10
11
cd /etc/openvpn/easy-rsa3/

#初始化目录
./easyrsa init-pki

#创建根证书
#nopass 参数表示不加密;也可以不加此参数,那就需要输入密码短语
./easyrsa build-ca nopass

#创建服务端秘钥
./easyrsa gen-req server nopass

1
2
3
4
5
#给服务端证书签名,这里要输入yes才能完成
./easyrsa sign-req server server

##创建客户端秘钥
./easyrsa gen-req client nopass

1
2
#给客户端证书签名,这里要输入yes才能完成
./easyrsa sign-req client client

1
2
3
4
5
#创建Diffie-Hellman
./easyrsa gen-dh

#创建TLS认证密钥
openvpn --genkey --secret /etc/openvpn/ta.key

拷贝证书到目录

1
2
3
4
5
#目录自定义,配置文件中要用到
/etc/openvpn/easy-rsa3/pki/
cp ca.crt dh.pem /etc/openvpn/
cp private/server.key issued/server.crt /etc/openvpn/server/
cp private/client.key issued/client.crt /etc/openvpn/client/

编辑配置文件

1
2
3
4
5
6
7
8
9
10
11
12
13
14
15
16
17
18
19
20
21
22
23
24
25
26
27
28
29
30
31
32
33
34
35
36
37
38
39
40
41
42
43
44
45
46
47
48
49
50
51
52
53
54
55
56
57
58
59
60
61
cd /etc/openvpn/

cp /usr/share/doc/openvpn-2.4.8/sample/sample-config-files/server.conf ./

vim server.conf

#监听本机ip地址
local 0.0.0.0
#监控本机端口号
port 1194
#指定采用的传输协议,可以选择tcp或udp
proto tcp
#指定创建的通信隧道类型,可选tun或tap
dev tun
#指定CA证书的文件路径
ca /etc/openvpn/ca.crt
#指定服务器端的证书文件路径
cert /etc/openvpn/server/server.crt
#指定服务器端的私钥文件路径
key /etc/openvpn/server/server.key
#指定迪菲赫尔曼参数的文件路径
dh /etc/openvpn/dh.pem
#指定虚拟局域网占用的IP地址段和子网掩码,此处配置的服务器自身占用.1的ip地址
server 10.8.0.0 255.255.255.0
#服务器自动给客户端分配IP后,客户端下次连接时,仍然采用上次的IP地址(第一次分配的IP保存在ipp.txt中,下一次分配其中保存的IP)。
ifconfig-pool-persist ipp.txt
#自动推送客户端上的网关及DHCP
push "redirect-gateway def1 bypass-dhcp"
#OpenVPN的DHCP功能为客户端提供指定的 DNS、WINS 等
push "dhcp-option DNS 114.114.114.114"
#允许客户端与客户端相连接,默认情况下客户端只能与服务器相连接
client-to-client
#每10秒ping一次,连接超时时间设为120秒
keepalive 10 120
#开启TLS-auth,使用ta.key防御攻击。服务器端的第二个参数值为0,客户端的为1。
tls-auth /etc/openvpn/ta.key 0
#加密认证算法
cipher AES-256-CBC
auth SHA512
tls-version-min 1.2
tls-cipher TLS-DHE-RSA-WITH-AES-256-GCM-SHA384:TLS-DHE-RSA-WITH-AES-128-GCM-SHA256:TLS-DHE-RSA-WITH-AES-256-CBC-SHA:TLS-DHE-RSA-WITH-CAMELLIA-256-CBC-SHA:TLS-DHE-RSA-WITH-AES-128-CBC-SHA:TLS-DHE-RSA-WITH-CAMELLIA-128-CBC-SHA
#使用lzo压缩的通讯,服务端和客户端都必须配置
comp-lzo
compress "lz4"
#最大连接用户
max-clients 100
#定义运行的用户和组
user openvpn
group openvpn
#重启时仍保留一些状态
persist-key
persist-tun
#输出短日志,每分钟刷新一次,以显示当前的客户端
status /var/log/openvpn-status.log
#日志保存路径
log /var/log/openvpn.log
log-append /var/log/openvpn.log
#指定日志文件的记录详细级别,可选0-9,等级越高日志内容越详细
verb 4
#相同信息的数量,如果连续出现 20 条相同的信息,将不记录到日志中
mute 20

配置系统转发和开放端口,云服务器记得安全组要开放对应端口

1
2
3
4
5
6
7
8
9
10
11
12
13
14
15
16
#修改文件目录权限
chown root.openvpn /etc/openvpn/* -R

#/etc/sysctl.conf 配置文件中添加
net.ipv4.ip_forward=1

#生效
sysctl -p

#iptables
iptables -t nat -A POSTROUTING -s 10.8.0.0/24 -o eth0 -j MASQUERADE
iptables -I INPUT -p tcp --dport 1194 -j ACCEPT

#保存规则并重启
service iptables save
systemctl restart iptables

启动openvpn服务

1
2
3
4
5
6
#启动openvpn服务
systemctl start openvpn@server

#确认服务进程是否存在
netstat -nap|grep openvpn
ps -ef|grep openvpn

win10客户端连接测试

下载客户端:

openvpn-install-2.4.8-I602-Win10.exe

证书配置

把ca.crt、client.crt、client.key、ta.key 4个文件放到软件安装目录下\OpenVPN\config

编辑配置文件

新建文件client.ovpn,把下面的参数粘贴到里面

1
2
3
4
5
6
7
8
9
10
11
12
13
14
15
16
17
18
19
20
21
22
#客户端配置文件
client
dev tun
proto tcp
remote 你的服务器ip/域名 1194
resolv-retry infinite
nobind
persist-key
persist-tun
ca ca.crt
cert client.crt
key client.key
ns-cert-type server
tls-auth ta.key 1
cipher AES-256-CBC
auth SHA512
tls-version-min 1.2
tls-cipher TLS-DHE-RSA-WITH-AES-256-GCM-SHA384:TLS-DHE-RSA-WITH-AES-128-GCM-SHA256:TLS-DHE-RSA-WITH-AES-256-CBC-SHA:TLS-DHE-RSA-WITH-CAMELLIA-256-CBC-SHA:TLS-DHE-RSA-WITH-AES-128-CBC-SHA:TLS-DHE-RSA-WITH-CAMELLIA-128-CBC-SHA
auth-nocache
verb 4
comp-lzo
compress "lz4"

启动OpenVPN GUI软件

连通性和上网测试

密码认证

基于证书的认证方式已经完成了,但是有些老铁想要用用户名和密码来认证,那要怎么做呢?下面介绍基于用户密码的认证方式

在证书认证的基础上修改openvpn配置

修改服务端 server.conf配置文件

1
2
3
4
5
6
7
8
9
10
11
12
#添加几个参数
#客户端不进行证书认证,如果不加将实现证书和用户密码双重认证
client-cert-not-required

#用户和密码验证脚本
auth-user-pass-verify /etc/openvpn/checkpsw.sh via-env

#使用用户名密码登录认证
username-as-common-name

#脚本安全级别
script-security 3

创建脚本和用户密码文件

1
2
3
4
5
6
7
8
9
10
11
12
13
14
15
16
17
18
19
20
21
22
23
24
25
26
27
28
29
30
31
32
33
34
35
36
37
38
39
40
41
42
43
44
45
46
47
48
49
50
51
#脚本
vim /etc/openvpn/checkpsw.sh

#!/bin/bash
#############################################
# checkpsw.sh (C) 2004 Mathias Sundman <mathias@openvpn.se>
#
# This script will authenticate OpenVPN users against
# a plain text file. The passfile should simply contain
# one row per user with the username first followed by
# one or more space(s) or tab(s) and then the password.

PASSFILE="/etc/openvpn/psw-file"
LOG_FILE="/var/log/openvpn-password.log"
TIME_STAMP=`date "+%Y-%m-%d %T"`

#############################################

if [ ! -r "${PASSFILE}" ]; then
echo "${TIME_STAMP}: Could not open password file \"${PASSFILE}\" for reading." >> ${LOG_FILE}
exit 1
fi

CORRECT_PASSWORD=`awk '!/^;/&&!/^#/&&$1=="'${username}'"{print $2;exit}' ${PASSFILE}`
if [ "${CORRECT_PASSWORD}" = "" ]; then
echo "${TIME_STAMP}: User does not exist: username=\"${username}\", password=\"${password}\"." >> ${LOG_FILE}
exit 1
fi

if [ "${password}" = "${CORRECT_PASSWORD}" ]; then
echo "${TIME_STAMP}: Successful authentication: username=\"${username}\"." >> ${LOG_FILE}
exit 0
fi

echo "${TIME_STAMP}: Incorrect password: username=\"${username}\", password=\"${password}\"." >> ${LOG_FILE}
exit 1

#增加执行权限
chmod +x /etc/openvpn/checkpsw.sh

#用户密码文件,格式:一行对应一个用户
vim psw-file
wandou 123456
duoduo 456789

#修改权限
chmod 777 psw-file
chown root.openvpn /etc/openvpn/* -R

#重启openvpn服务
systemctl restart openvpn@server

win10 客户端配置文件修改

1
2
3
4
5
6
#注释掉
;cert client.crt
;key client.key

#添加上
auth-user-pass

管理界面安装

下载pam_sqlite3并安装

1
2
3
git clone https://gitee.com/lang13002/pam_sqlite3.git
cd pam_sqlite3
make && make install

添加pam认证文件

1
2
3
4
# vim /etc/pam.d/openvpn

auth required pam_sqlite3.so db=/etc/openvpn/openvpn.db table=t_user user=username passwd=password expire=expire crypt=1
account required pam_sqlite3.so db=/etc/openvpn/openvpn.db table=t_user user=username passwd=password expire=expire crypt=1

创建sqlite3数据库文件

1
2
3
4
5
6
7
8
9
# sqlite3 /etc/openvpn/openvpn.db

sqlite> create table t_user (
username text not null,
password text not null,
active int,
expire text
);
sqlite> .quit

在服务端配置添加认证插件

生成插件

因为用yum安装默认是没有插件的,所以需要用源码先生成插件。有了这个插件openvpn才能用数据库来管理

1
2
3
4
5
6
7
8
9
10
11
12
13
# 安装依赖组件,如果不安装会报错
yum install lzo-devel
# 下载源码包
wget https://files01.tchspt.com/temp/openvpn-2.4.9.tar.gz
# 解压
tar -xzvf openvpn-2.4.9.tar.gz
# 插件生成
cd openvpn-2.4.9
./configure
cd src/plugins/auth-pam/
make -j4
cd .libs/
cp openvpn-plugin-auth-pam.so /etc/openvpn/

在openvpn的服务器配置中添加下面配置

1
2
3
verify-client-cert none
username-as-common-name
plugin /etc/openvpn/openvpn-plugin-auth-pam.so openvpn

安装依赖

1
pip2 install peewee tornado==5.1.1

下载openvpn-web

1
git clone https://gitee.com/lang13002/openvpn_web.git

创建相应的数据库表

1
2
# sqlite3 /etc/openvpn/openvpn.db
sqlite> .read openvpn_web/model/openvpn.sql

OpenVPN运行脚本写日志

服务端配置添加运行脚本

1
2
3
script-security 2
client-connect /etc/openvpn/server/connect.py
client-disconnect /etc/openvpn/server/disconnect.py

connect.py

1
2
3
4
5
6
7
8
9
10
11
12
13
14
15
16
17
18
19
20
21
#!/usr/bin/python

import os
import time
import sqlite3

username = os.environ['common_name']
trusted_ip = os.environ['trusted_ip']
trusted_port = os.environ['trusted_port']
local = os.environ['ifconfig_local']
remote = os.environ['ifconfig_pool_remote_ip']
timeunix= os.environ['time_unix']

logintime = time.strftime("%Y-%m-%d %H:%M:%S", time.localtime(time.time()))

conn = sqlite3.connect("/etc/openvpn/openvpn.db")
cursor = conn.cursor()
query = "insert into t_logs(username, timeunix, trusted_ip, trusted_port, local, remote, logintime) values('%s','%s', '%s', '%s', '%s', '%s', '%s')" % (username, timeunix, trusted_ip, trusted_port, local, remote, logintime)
cursor.execute(query)
conn.commit()
conn.close()

disconnect.py

1
2
3
4
5
6
7
8
9
10
11
12
13
14
15
16
17
18
19
#!/usr/bin/python

import os
import time
import sqlite3

username = os.environ['common_name']
trusted_ip = os.environ['trusted_ip']
received = os.environ['bytes_received']
sent = os.environ['bytes_sent']

logouttime = time.strftime("%Y-%m-%d %H:%M:%S", time.localtime(time.time()))

conn = sqlite3.connect("/etc/openvpn/openvpn.db")
cursor = conn.cursor()
query = "update t_logs set logouttime='%s', received='%s', sent= '%s' where username = '%s' and trusted_ip = '%s'" % (logouttime, received, sent, username, trusted_ip)
cursor.execute(query)
conn.commit()
conn.close()

启动服务

1
python myapp.py

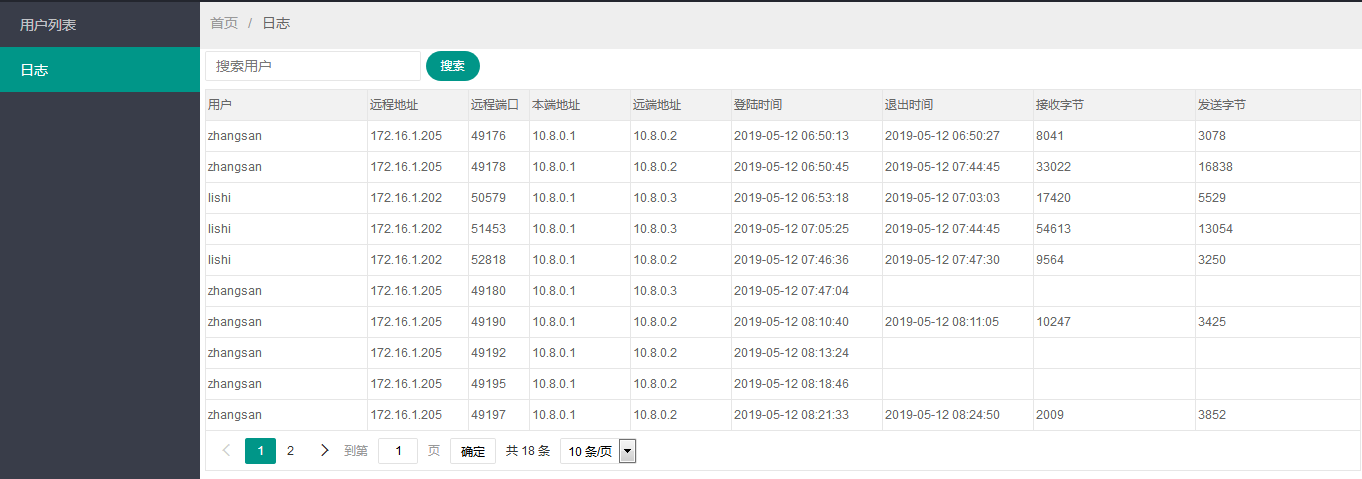
管理界面

img

img

自定义路由配置

通常openvpn部署好以后,客户端连接VPN后会被配置一些路由,其客户端的路由会被修改为所有的流量都通过VPN来传输。但有时候,我们需要客户端的某些IP走VPN或者本地网关。这里有两种方法进行openvpn的路由配置

第一种方法: 客户端进行配置

在配置文件下增加如下内容:

1
2
3
4
route-nopull # 客户端连接openvpn后 不从服务端获取路由
max-routes 1000 # 设置路由的最大条数,默认是100,这里可以根据需求修改
route 192.168.0.0 255.255.255.0 net_gateway # 使192.168.0.0/24网段,不走vpn网关
route 192.168.1.0 255.255.255.0 vpn_gateway # 使192.168.1.0/24网段,走vpn网关

注意: 如果配置中有 redirect-gateway def1 则需要先移除

添加vpn_gateway参数使部分IP访问走OpenVPN出去。net_gatewayvpn_gateway 相反, 他表示在默认全部走OpenVPN ,强行指定部分 IP 访问不通过 OpenVPN 出去。

第二种方法: 在服务端进行配置

服务端和客户端的配置略有不同

1
2
push "route 192.168.0.0 255.255.255.0 net_gateway" # 将引号中的路由推送到客户端
push "route 192.168.1.0 255.255.255.0 vpn_gateway" # 将引号中的路由推送到客户端

注意: 如果配置中有 redirect-gateway 则需要先移除

配置完成后,需要重启openvpn服务。

两种方法选取其一即可。

-------------本文结束感谢您的阅读-------------

本文标题:Centos7搭建神器openvpn

文章作者:豌豆多多

发布时间:2020年02月12日 - 10:02

最后更新:2020年12月11日 - 19:12

原始链接:https://wandouduoduo.github.io/articles/decac6ef.html

许可协议: 署名-非商业性使用-禁止演绎 4.0 国际 转载请保留原文链接及作者。

原创技术分享,您的支持将鼓励我继续创作