Glusterfs框架
Glusterfs(Gluster file system)是开源的,具有强大横向扩展能力的(scale-out),分布式的,可将来自多个服务器的存储资源通过tcp/ip或infiniBand RDMA 网络整合到一个统一的全局命名空间中的文件系统。
框架
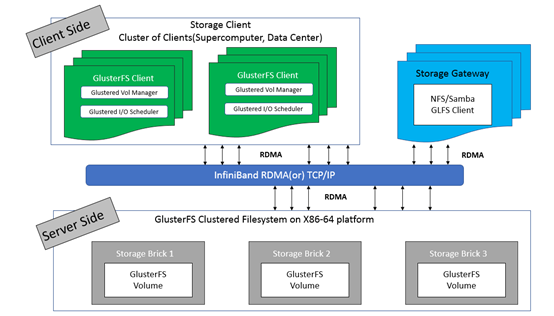
- GlusterFS主要由存储服务器(Brick Server)、客户端以及 NFS/Samba 存储网关组成;
- 架构中无元数据服务器组件,无对于提升整个系统的性单点故障和性能瓶颈问题,可提高系统扩展性、性能、可靠性和稳定性;
- GlusterFS支持 TCP/IP 和 InfiniBand RDMA 高速网络互联;
- 客户端可通过原生 GlusterFS 协议访问数据,其他没有运行 GlusterFS 客户端的终端可通过 NFS/CIFS 标准协议通过存储网关访问数据(存储网关提供弹性卷管理和访问代理功能);
- 存储服务器主要提供基本的数据存储功能,客户端弥补了没有元数据服务器的问题,承担了更多的功能,包括数据卷管理、I/O 调度、文件定位、数据缓存等功能,利用 FUSE(File system in User Space)模块将 GlusterFS 挂载到本地文件系统之上,实现 POSIX 兼容的方式来访问系统数据。
常见术语
- Brick:GlusterFS中最基本的存储单元,表示为受信存储池(trusted storage pool)中输出的目录,供客户端挂载用,可以通过主机名与目录名来标识,如’SERVER:EXPORT’;
- Volume:卷,逻辑上由N个brick组成;
- FUSE:Unix-like OS上的可动态加载的模块,允许用户不用修改内核即可创建自己的文件系统;
- Glusterd:Gluster management daemon,在trusted storage pool中所有的服务器上运行;
- Volfile:Glusterfs进程的配置文件,通常是位于/var/lib/glusterd/vols/目录下的{volname}文件;
- Self-heal:用于后台运行检测复本卷中文件与目录的不一致性并解决这些不一致;
- Split-brain:脑裂;
- GFID:GlusterFS卷中的每个文件或目录都有一个唯一的128位的数据相关联,用于模拟inode;
- Namespace:每个Gluster卷都导出单个ns作为POSIX的挂载点。
数据访问流程
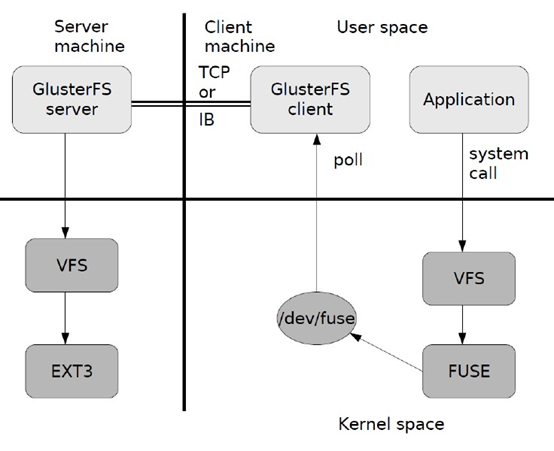
- 在客户端,用户通过 glusterfs的mount point读写数据;
- 用户的这个操作被递交给本地 Linux 系统的VFS 来处理;
- VFS 将数据递交给 FUSE 内核文件系统(在启动 glusterfs 客户端以前,需要向系统注册一个实际的文件系统 FUSE),该文件系统与 ext3 在同一个层次, ext3 是对实际的磁盘进行处理,而 fuse 文件系统则是将数据通过 /dev/fuse 这个设备文件递交给了glusterfs client 端,可以将 fuse 文件系统理解为一个代理;
- 数据被 fuse 递交给 Glusterfs client 后, client 对数据进行一些指定的处理(即按 client 配置文件来进行的一系列处理);
- 在 glusterfs client 的处理末端,通过网络将数据递交给 Glusterfs Server, 并且将数据写入到服务器所控制的存储设备上。
参考文档
Quick Start Guide:http://gluster.readthedocs.io/en/latest/Quick-Start-Guide/Quickstart/
Install-Guide:https://docs.gluster.org/en/latest/Install-Guide/Install/
CentOS gluster-Quickstart:https://wiki.centos.org/SpecialInterestGroup/Storage/gluster-Quickstart
Type of Volumes:https://docs.gluster.org/en/latest/Quick-Start-Guide/Architecture/#types-of-volumes
Setting up GlusterFS Volumes:[https://docs.gluster.org/en/latest/Administrator%20Guide/Setting%20Up%20Volumes/](https://docs.gluster.org/en/latest/Administrator Guide/Setting Up Volumes/)
脑裂:[https://docs.gluster.org/en/latest/Administrator%20Guide/Split%20brain%20and%20ways%20to%20deal%20with%20it/](https://docs.gluster.org/en/latest/Administrator Guide/Split brain and ways to deal with it/)
Glusterfs技术详解(推荐):https://czero000.github.io/2016/04/05/glusterfs-technical-explanation.html
环境
环境规划
| Hostname | IP | Service | Remark |
|---|---|---|---|
| glusterfs-client | 172.30.200.50 | glusterfs(3.12.9)glusterfs-fuse | 客户端 |
| glusterfs01 | 172.30.200.51 | glusterfs(3.12.9)glusterfs-server(3.12.9)glusterfs-fuse | 服务器端 |
| glusterfs02 | 172.30.200.52 | glusterfs(3.12.9)glusterfs-server(3.12.9)glusterfs-fuse | 服务器端 |
| glusterfs03 | 172.30.200.53 | glusterfs(3.12.9)glusterfs-server(3.12.9)glusterfs-fuse | 服务器端 |
| glusterfs04 | 172.30.200.54 | glusterfs(3.12.9)glusterfs-server(3.12.9)glusterfs-fuse | 服务器端 |
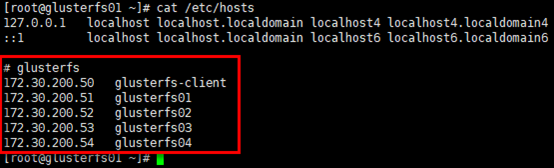
设置hosts
1 | # 所有节点保持一致的hosts即可,以gluster01节点为例; |
设置ntp
1 | # 至少4个Brick Server节点需要保持时钟同步(重要),以glusterfs01节点为例 |
设置glusterfs packages
1 | # 全部节点安装glusterfs yum源 |
设置iptables
1 | # 提前统一设置iptables(至少4个Brick Server节点),以glusterfs01节点为例; |
设置glusterfs
mount brick
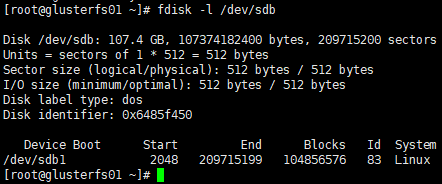
创建分区
1 | # 各brick server的磁盘挂载前需要创建分区并格式化,以glusterfs01节点为例; |
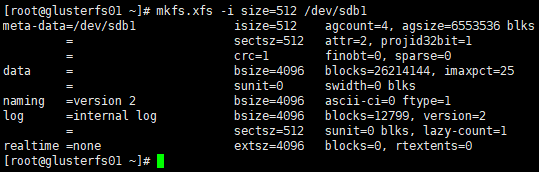
格式化分区
1 | [root@glusterfs01 ~]# mkfs.xfs -i size=512 /dev/sdb1 |
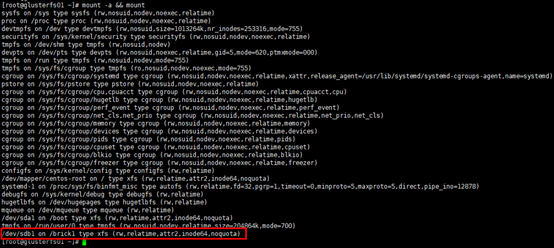
挂载分区
1 | # 创建挂载目录,目录名自定义; |
启动glusterfs-server
安装glusterfs-server
1 | # 在4个brick server节点安装glusterfs-server,以glusterfs01节点为例 |
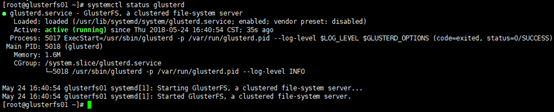
启动glusterfs-server
1 | [root@glusterfs01 ~]# systemctl enable glusterd |
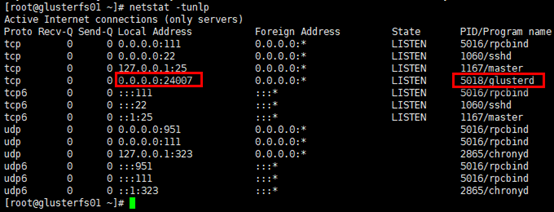
1 | # 查看服务监听端口 |
组建受信存储池
受信存储池(trusted storage pools),是1个可信的网络存储服务器,为卷提供brick,可以理解为集群。
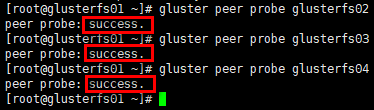
1 | # 在任意一个server节点组建受信存储池均可,即由任意节点邀请其他节点组建存储池; |
1 | # 查看受信存储池状态; |

设置glusterfs-client
1 | # 客户端主要安装两个组件,glusterfs与glusterfs-fuse; |

