生产mysql数据库集群优化<二>--proxysql安装及优化

前面文章对数据库中间层进行了选型,那么要怎么安装,怎么验证,怎么优化,又有哪些坑可以避免呢?本文就详细介绍下。

ProxySQL 安装 (两种方式)

1
2
3
4
5
6
7
8
9
10
11
12
13
14
15
16
17
18
19
20
21
22
23
24
25
26
27
28
29
30
31
32
33
34
35
36
37
38
39
40
41
42
43
44
45
46
47
48
49
50
51
52
53
54
55
56
57
58
59
60
61
62
63
64
65
66
67
68
69
70
71
72
73
1) 采用yum方式安装
[root@mysql-proxy ~]# vim /etc/yum.repos.d/proxysql.repo
[proxysql_repo]
name= ProxySQL YUM repository
baseurl=http://repo.proxysql.com/ProxySQL/proxysql-1.4.x/centos/\$releasever
gpgcheck=1
gpgkey=http://repo.proxysql.com/ProxySQL/repo_pub_key

执行安装
[root@mysql-proxy ~]# yum clean all
[root@mysql-proxy ~]# yum makecache
[root@mysql-proxy ~]# yum -y install proxysql

[root@mysql-proxy ~]# proxysql --version
ProxySQL version 1.4.13-15-g69d4207, codename Truls

启动ProxySQL
[root@mysql-proxy ~]# chkconfig proxysql on
[root@mysql-proxy ~]# systemctl start proxysql
[root@mysql-proxy ~]# systemctl status proxysql

启动后会监听两个端口,
默认为6032和6033。6032端口是ProxySQL的管理端口,6033是ProxySQL对外提供服务的端口 (即连接到转发后端的真正数据库的转发端口)。
[root@mysql-proxy ~]# netstat -tunlp
Active Internet connections (only servers)
Proto Recv-Q Send-Q Local Address Foreign Address State PID/Program name
tcp 0 0 0.0.0.0:6032 0.0.0.0:* LISTEN 23940/proxysql
tcp 0 0 0.0.0.0:6033 0.0.0.0:* LISTEN 23940/proxysql

2)采用rpm包方式安装
proxysql的rpm包下载地址: https://pan.baidu.com/s/1S1_b5DKVCpZSOUNmtCXrrg
提取密码: 5t1c

[root@mysql-proxy ~]# wget https://github.com/sysown/proxysql/releases/download/v1.4.8/proxysql-1.4.8-1-centos7.x86_64.rpm
[root@mysql-proxy ~]# rpm -ivh proxysql-1.4.8-1-centos7.x86_64.rpm --force

[root@mysql-proxy ~]# /etc/init.d/proxysql start
Starting ProxySQL: DONE!

[root@mysql-proxy ~]# ss -lntup|grep proxy
tcp LISTEN 0 128 *:6032 *:* users:(("proxysql",pid=2943,fd=24))
tcp LISTEN 0 128 *:6033 *:* users:(("proxysql",pid=2943,fd=22))
tcp LISTEN 0 128 *:6033 *:* users:(("proxysql",pid=2943,fd=21))
tcp LISTEN 0 128 *:6033 *:* users:(("proxysql",pid=2943,fd=20))
tcp LISTEN 0 128 *:6033 *:* users:(("proxysql",pid=2943,fd=19))

如上可以看出转发端口6033是启动了四个线程

==============================================================
以上两种方式采用任何一种都可以顺利安装proxysql插件。

另外,记得在proxysql服务器上安装mysql客户端,用于在本机连接到ProxySQL的管理接口
[root@mysql-proxy ~]# vim /etc/yum.repos.d/mariadb.repo
[mariadb]
name = MariaDB
baseurl = http://yum.mariadb.org/10.3.5/centos6-amd64
gpgkey=https://yum.mariadb.org/RPM-GPG-KEY-MariaDB
gpgcheck=1

安装mysql-clinet客户端
[root@mysql-proxy ~]# yum install -y MariaDB-client

--------------------------------------------------------------------------------------------------------------------------------------------------------
如果遇到报错:
Error: MariaDB-compat conflicts with 1:mariadb-libs-5.5.60-1.el7_5.x86_64
You could try using --skip-broken to work around the problem
You could try running: rpm -Va --nofiles --nodigest

解决办法:
[root@mysql-proxy ~]# rpm -qa|grep mariadb*
mariadb-libs-5.5.56-2.el7.x86_64
[root@mysql-proxy ~]# rpm -e mariadb-libs-5.5.56-2.el7.x86_64 --nodeps
[root@mysql-proxy ~]# yum install -y MariaDB-client

ProxySQL配置

ProxySQL有配置文件/etc/proxysql.cnf和配置数据库文件/var/lib/proxysql/proxysql.db。这里需要特别注意:如果存在如果存在”proxysql.db”文件(在/var/lib/proxysql目录下),则ProxySQL服务只有在第一次启动时才会去读取proxysql.cnf文件并解析;后面启动会就不会读取proxysql.cnf文件了!如果想要让proxysql.cnf文件里的配置在重启proxysql服务后生效(即想要让proxysql重启时读取并解析proxysql.cnf配置文件),则需要先删除/var/lib/proxysql/proxysql.db数据库文件,然后再重启proxysql服务。这样就相当于初始化启动proxysql服务了,会再次生产一个纯净的proxysql.db数据库文件(如果之前配置了proxysql相关路由规则等,则就会被抹掉)。 官方推荐用admin interface方式!(即在proxysql本机使用mysql客户端连接管理端口)

1
2
3
4
5
6
7
8
9
10
11
12
13
14
15
16
17
18
19
20
21
22
23
24
25
26
27
28
29
30
31
32
33
34
35
36
37
38
39
40
41
42
43
44
45
46
47
48
49
50
51
52
53
54
55
56
57
58
59
60
61
62
63
64
65
66
67
68
69
70
71
72
73
74
75
76
77
78
79
80
81
82
83
84
85
86
87
88
89
90
91
92
93
94
95
96
97
98
99
100
101
102
103
104
105
106
107
108
109
110
111
112
113
114
115
116
117
118
119
120
121
122
123
124
125
126
127
128
129
130
131
132
133
134
135
136
137
138
139
140
141
142
143
144
145
146
147
148
149
150
151
152
153
154
155
156
157
158
159
160
161
162
163
164
165
166
167
168
169
170
171
172
173
174
175
176
177
178
179
180
181
182
183
184
185
186
187
188
189
190
191
192
193
194
195
196
197
198
199
200
201
202
203
204
205
206
207
208
209
210
211
212
213
214
215
216
217
218
219
220
221
222
223
224
225
226
227
228
229
230
231
232
233
234
235
236
237
[root@mysql-proxy ~]# egrep -v "^#|^$" /etc/proxysql.cnf
datadir="/var/lib/proxysql" #数据目录
admin_variables=
{
admin_credentials="admin:admin" #连接管理端的用户名与密码
mysql_ifaces="0.0.0.0:6032" #管理端口,用来连接proxysql的管理数据库
}
mysql_variables=
{
threads=4 #指定转发端口开启的线程数量
max_connections=2048
default_query_delay=0
default_query_timeout=36000000
have_compress=true
poll_timeout=2000
interfaces="0.0.0.0:6033" #指定转发端口,用于连接后端mysql数据库的,相当于代理作用
default_schema="information_schema"
stacksize=1048576
server_version="5.5.30" #指定后端mysql的版本
connect_timeout_server=3000
monitor_username="monitor"
monitor_password="monitor"
monitor_history=600000
monitor_connect_interval=60000
monitor_ping_interval=10000
monitor_read_only_interval=1500
monitor_read_only_timeout=500
ping_interval_server_msec=120000
ping_timeout_server=500
commands_stats=true
sessions_sort=true
connect_retries_on_failure=10
}
mysql_servers =
(
)
mysql_users:
(
)
mysql_query_rules:
(
)
scheduler=
(
)
mysql_replication_hostgroups=
(
)


proxysql的数据目录
[root@mysql-proxy ~]# ll /var/lib/proxysql/
total 1014052
-rw------- 1 root root 122880 Jan 25 14:33 proxysql.db
-rw------- 1 root root 1023288179 Jan 28 12:30 proxysql.log
-rw-r--r-- 1 root root 6 Jan 25 14:20 proxysql.pid
-rw------- 1 root root 1736704 Jan 28 12:29 proxysql_stats.db

查看main库(默认登陆后即在此库)的global_variables表信息
MySQL [(none)]> show databases;
+-----+---------------+-------------------------------------+
| seq | name | file |
+-----+---------------+-------------------------------------+
| 0 | main | |
| 2 | disk | /var/lib/proxysql/proxysql.db |
| 3 | stats | |
| 4 | monitor | |
| 5 | stats_history | /var/lib/proxysql/proxysql_stats.db |
+-----+---------------+-------------------------------------+
5 rows in set (0.000 sec)

MySQL [(none)]> use main;
Reading table information for completion of table and column names
You can turn off this feature to get a quicker startup with -A

Database changed
MySQL [main]> show tables;
+--------------------------------------------+
| tables |
+--------------------------------------------+
| global_variables |
| mysql_collations |
| mysql_group_replication_hostgroups |
| mysql_query_rules |
| mysql_query_rules_fast_routing |
| mysql_replication_hostgroups |
| mysql_servers |
| mysql_users |
| proxysql_servers |
| runtime_checksums_values |
| runtime_global_variables |
| runtime_mysql_group_replication_hostgroups |
| runtime_mysql_query_rules |
| runtime_mysql_query_rules_fast_routing |
| runtime_mysql_replication_hostgroups |
| runtime_mysql_servers |
| runtime_mysql_users |
| runtime_proxysql_servers |
| runtime_scheduler |
| scheduler |
+--------------------------------------------+
20 rows in set (0.000 sec)

MySQL [main]> select * from global_variables;
+-----------------------------------------------------+---------------------------+
| variable_name | variable_value |
+-----------------------------------------------------+---------------------------+
| mysql-shun_on_failures | 5 |
| mysql-shun_recovery_time_sec | 10 |
| mysql-query_retries_on_failure | 1 |
| mysql-connect_retries_delay | 1 |
| mysql-connection_delay_multiplex_ms | 0 |
| mysql-connection_max_age_ms | 0 |
| mysql-connect_timeout_server_max | 10000 |
| mysql-eventslog_filename | |
| mysql-eventslog_filesize | 104857600 |
| mysql-default_charset | utf8 |
| mysql-free_connections_pct | 10 |
| mysql-session_idle_ms | 1000 |
| mysql-client_found_rows | true |
| mysql-monitor_enabled | true |
| mysql-monitor_connect_timeout | 600 |
| mysql-monitor_ping_max_failures | 3 |
| mysql-monitor_ping_timeout | 1000 |
| mysql-monitor_read_only_max_timeout_count | 3 |
| mysql-monitor_replication_lag_interval | 10000 |
| mysql-monitor_replication_lag_timeout | 1000 |
| mysql-monitor_groupreplication_healthcheck_interval | 5000 |
| mysql-monitor_groupreplication_healthcheck_timeout | 800 |
| mysql-monitor_replication_lag_use_percona_heartbeat | |
| mysql-monitor_query_interval | 60000 |
| mysql-monitor_query_timeout | 100 |
| mysql-monitor_slave_lag_when_null | 60 |
| mysql-monitor_wait_timeout | true |
| mysql-monitor_writer_is_also_reader | true |
| mysql-max_allowed_packet | 4194304 |
| mysql-throttle_connections_per_sec_to_hostgroup | 1000000 |
| mysql-max_transaction_time | 14400000 |
| mysql-multiplexing | true |
| mysql-forward_autocommit | false |
| mysql-enforce_autocommit_on_reads | false |
| mysql-autocommit_false_not_reusable | false |
| mysql-autocommit_false_is_transaction | false |
| mysql-verbose_query_error | false |
| mysql-hostgroup_manager_verbose | 1 |
| mysql-threshold_query_length | 524288 |
| mysql-threshold_resultset_size | 4194304 |
| mysql-query_digests_max_digest_length | 2048 |
| mysql-query_digests_max_query_length | 65000 |
| mysql-wait_timeout | 28800000 |
| mysql-throttle_max_bytes_per_second_to_client | 2147483647 |
| mysql-throttle_ratio_server_to_client | 0 |
| mysql-max_stmts_per_connection | 20 |
| mysql-max_stmts_cache | 10000 |
| mysql-mirror_max_concurrency | 16 |
| mysql-mirror_max_queue_length | 32000 |
| mysql-default_max_latency_ms | 1000 |
| mysql-query_processor_iterations | 0 |
| mysql-query_processor_regex | 1 |
| mysql-long_query_time | 1000 |
| mysql-query_cache_size_MB | 256 |
| mysql-poll_timeout_on_failure | 100 |
| mysql-server_capabilities | 45578 |
| mysql-session_idle_show_processlist | true |
| mysql-query_digests | true |
| mysql-query_digests_lowercase | false |
| mysql-servers_stats | true |
| mysql-default_reconnect | true |
| mysql-ssl_p2s_ca | |
| mysql-ssl_p2s_cert | |
| mysql-ssl_p2s_key | |
| mysql-ssl_p2s_cipher | |
| mysql-init_connect | |
| mysql-default_sql_mode | |
| mysql-default_time_zone | SYSTEM |
| mysql-connpoll_reset_queue_length | 50 |
| mysql-stats_time_backend_query | false |
| mysql-stats_time_query_processor | false |
| mysql-threads | 4 |
| mysql-max_connections | 2048 |
| mysql-default_query_delay | 0 |
| mysql-default_query_timeout | 36000000 |
| mysql-have_compress | true |
| mysql-poll_timeout | 2000 |
| mysql-interfaces | 0.0.0.0:6033 |
| mysql-default_schema | information_schema |
| mysql-stacksize | 1048576 |
| mysql-server_version | 5.5.30 |
| mysql-connect_timeout_server | 3000 |
| mysql-monitor_username | proxysql |
| mysql-monitor_password | proxysql |
| mysql-monitor_history | 600000 |
| mysql-monitor_connect_interval | 60000 |
| mysql-monitor_ping_interval | 10000 |
| mysql-monitor_read_only_interval | 1500 |
| mysql-monitor_read_only_timeout | 500 |
| mysql-ping_interval_server_msec | 120000 |
| mysql-ping_timeout_server | 500 |
| mysql-commands_stats | true |
| mysql-sessions_sort | true |
| mysql-connect_retries_on_failure | 10 |
| admin-stats_credentials | stats:stats |
| admin-stats_mysql_connections | 60 |
| admin-stats_mysql_connection_pool | 60 |
| admin-stats_mysql_query_cache | 60 |
| admin-stats_system_cpu | 60 |
| admin-stats_system_memory | 60 |
| admin-telnet_admin_ifaces | (null) |
| admin-telnet_stats_ifaces | (null) |
| admin-refresh_interval | 2000 |
| admin-read_only | false |
| admin-hash_passwords | true |
| admin-cluster_username | |
| admin-cluster_password | |
| admin-cluster_check_interval_ms | 1000 |
| admin-cluster_check_status_frequency | 10 |
| admin-cluster_mysql_query_rules_diffs_before_sync | 3 |
| admin-cluster_mysql_servers_diffs_before_sync | 3 |
| admin-cluster_mysql_users_diffs_before_sync | 3 |
| admin-cluster_proxysql_servers_diffs_before_sync | 3 |
| admin-cluster_mysql_query_rules_save_to_disk | true |
| admin-cluster_mysql_servers_save_to_disk | true |
| admin-cluster_mysql_users_save_to_disk | true |
| admin-cluster_proxysql_servers_save_to_disk | true |
| admin-checksum_mysql_query_rules | true |
| admin-checksum_mysql_servers | true |
| admin-checksum_mysql_users | true |
| admin-web_enabled | false |
| admin-web_port | 6080 |
| admin-admin_credentials | admin:admin|
| admin-mysql_ifaces | 0.0.0.0:6032 |
| admin-version | 1.4.8-32-g669c149 |
+-----------------------------------------------------+---------------------------+
125 rows in set (0.003 sec)

#登陆成功后,可通过对main库(默认登陆后即在此库)的global_variables表中的"admin-admin_credentials" 和 "admin-mysql_ifaces"
#两个变量进行更改来修改登录认证! 比如说修改密码或定义一个非admin的用户用于远程登录(下面会说到)。

proxysql的6032端口是管理入口,账号密码是admin(可以动态修改),允许客户端连接;6033端口就是客户端入口,账号密码通过管理接口去设置。在proxysql本机使用mysql客户端连接到ProxySQL的管理接口(admin interface), 该接口的默认管理员用户和密码都是admin。

mysql_ifaces
也就是说proxysql有一个admin接口专门来做配置,相当于一个mysql shell可以通过sql来让配置实时生效。
mysql_ifaces配置了允许连接proxysql的ip和port

1
2
3
4
5
[root@mysql-proxy ~]# vim /etc/proxysql.cnf
........
# 将admin_variables中的mysql_ifaces修改成允许远程访问
# mysql_ifaces="127.0.0.1:6032;/tmp/proxysql_admin.sock"
mysql_ifaces="0.0.0.0:6032"

如果ip配置为0.0.0.0表示不限制ip,但是出于安全考虑,admin用户无论怎么设置都只能在本机登录!!!

admin_credentials
这个key保存所有可以操作proxysql的用户名和密码,格式为:user:pass;user1:pass1,这里可以修改密码或定义一个非admin的用户用于远程登录。 前提是保证想要管理proxysql的机器安装有mysql client客户端!

1
2
3
4
5
6
7
8
9
10
11
12
13
14
15
16
17
18
19
20
21
22
23
24
25
26
27
28
29
30
31
32
33
34
35
36
37
38
39
40
41
42
43
44
45
46
47
48
先在proxysql本机登录 (因为初始账号密码是admin:admin,只能在本机登录), 这里的proxysql本机地址是172.16.60.214

修改远程连接proxysql管理端口的账号和密码radmin:radmin.
[root@mysql-proxy ~]# mysql -uadmin -padmin -h127.0.0.1 -P6032
Welcome to the MariaDB monitor. Commands end with ; or \g.
Your MySQL connection id is 34
Server version: 5.5.30 (ProxySQL Admin Module)

Copyright (c) 2000, 2018, Oracle, MariaDB Corporation Ab and others.

Type 'help;' or '\h' for help. Type '\c' to clear the current input statement.

MySQL [(none)]> update global_variables set variable_value = 'admin:admin;radmin:radmin' where variable_name = 'admin-admin_credentials';
Query OK, 1 row affected (0.002 sec)

MySQL [(none)]> LOAD ADMIN VARIABLES TO RUNTIME;
Query OK, 0 rows affected (0.000 sec)

MySQL [(none)]> SAVE ADMIN VARIABLES TO DISK;
Query OK, 31 rows affected (0.077 sec)


这样就可以使用下面的命令在其他机器上使用radmin用户登录(其他机器上需要有mysql client)
[root@MGR-node3 ~]# mysql -uradmin -pradmin -h172.16.60.214 -P6032
mysql: [Warning] Using a password on the command line interface can be insecure.
Welcome to the MySQL monitor. Commands end with ; or \g.
Your MySQL connection id is 35
Server version: 5.5.30 (ProxySQL Admin Module)

Copyright (c) 2000, 2018, Oracle and/or its affiliates. All rights reserved.

Oracle is a registered trademark of Oracle Corporation and/or its
affiliates. Other names may be trademarks of their respective
owners.

Type 'help;' or '\h' for help. Type '\c' to clear the current input statement.

mysql> show databases;
+-----+---------------+-------------------------------------+
| seq | name | file |
+-----+---------------+-------------------------------------+
| 0 | main | |
| 2 | disk | /var/lib/proxysql/proxysql.db |
| 3 | stats | |
| 4 | monitor | |
| 5 | stats_history | /var/lib/proxysql/proxysql_stats.db |
+-----+---------------+-------------------------------------+
5 rows in set (0.00 sec)

ProxySQL的库、表说明 (默认管理端口是6032,客户端服务端口是6033。默认的用户名密码都是 admin)

1
2
3
4
5
6
7
8
9
10
11
12
13
14
15
16
17
18
19
20
21
22
23
24
25
26
27
28
29
30
31
32
33
34
35
36
37
38
39
40
41
42
43
44
45
46
47
48
49
50
51
52
53
54
55
56
57
58
59
60
61
62
63
64
65
66
67
68
69
70
71
72
73
74
75
76
77
78
79
80
81
82
83
84
85
86
87
88
89
90
91
92
93
94
95
96
97
98
99
100
101
102
103
104
105
106
107
108
109
110
111
112
113
114
115
116
117
118
119
120
121
122
123
124
125
126
127
128
129
130
131
132
133
134
135
136
137
138
139
140
141
142
143
144
145
146
147
148
149
150
151
通过管理端口6032去连接的 (注意, 下面连接命令中后面的--prompt 'admin'字段可以不加,也是可以登录进去的)

[root@mysql-proxy ~]# mysql -uadmin -padmin -P6032 -h127.0.0.1
或者
[root@mysql-proxy ~]# mysql -uadmin -padmin -P6032 -h127.0.0.1 --prompt 'admin> '
Welcome to the MariaDB monitor. Commands end with ; or \g.
Your MySQL connection id is 33
Server version: 5.5.30 (ProxySQL Admin Module)

Copyright (c) 2000, 2018, Oracle, MariaDB Corporation Ab and others.

Type 'help;' or '\h' for help. Type '\c' to clear the current input statement.

admin> show databases;
+-----+---------------+-------------------------------------+
| seq | name | file |
+-----+---------------+-------------------------------------+
| 0 | main | |
| 2 | disk | /var/lib/proxysql/proxysql.db |
| 3 | stats | |
| 4 | monitor | |
| 5 | stats_history | /var/lib/proxysql/proxysql_stats.db |
+-----+---------------+-------------------------------------+
5 rows in set (0.000 sec)

ProxySQL提供了几个库,每个库都有各自的意义;
- main 内存配置数据库,表里存放后端db实例、用户验证、路由规则等信息。表名以 runtime_开头的表示proxysql当前运行的配置内容,
不能通过dml语句修改,只能修改对应的不以 runtime_ 开头的(在内存)里的表,然后 LOAD 使其生效, SAVE 使其存到硬盘以供下次重启加载。
- disk 是持久化到硬盘的配置,sqlite数据文件。
- stats 是proxysql运行抓取的统计信息,包括到后端各命令的执行次数、流量、processlist、查询种类汇总/执行时间等等。
- monitor 库存储 monitor 模块收集的信息,主要是对后端db的健康/延迟检查。

1) main 库 (disk库的表字段和main一样)
admin> show tables from main;
+--------------------------------------------+
| tables |
+--------------------------------------------+
| global_variables |
| mysql_collations |
| mysql_group_replication_hostgroups |
| mysql_query_rules |
| mysql_query_rules_fast_routing |
| mysql_replication_hostgroups |
| mysql_servers |
| mysql_users |
| proxysql_servers |
| runtime_checksums_values |
| runtime_global_variables |
| runtime_mysql_group_replication_hostgroups |
| runtime_mysql_query_rules |
| runtime_mysql_query_rules_fast_routing |
| runtime_mysql_replication_hostgroups |
| runtime_mysql_servers |
| runtime_mysql_users |
| runtime_proxysql_servers |
| runtime_scheduler |
| scheduler |
+--------------------------------------------+
20 rows in set (0.001 sec)

常用的几个表介绍
===============================================
global_variables
设置变量,包括监听的端口、管理账号等。

mysql_collations
相关字符集和校验规则。

mysql_query_rules
定义查询路由规则。

mysql_replication_hostgroups
监视指定主机组中所有服务器的read_only值,并且根据read_only的值将服务器分配给写入器或读取器主机组。ProxySQL monitor模块会监控hostgroups
后端所有servers 的read_only 变量,如果发现从库的read_only变为0、主库变为1,则认为角色互换了,自动改写mysql_servers表里面 hostgroup关系,
达到自动 Failover 效果。

mysql_servers
设置后端MySQL的表

mysql_users
配置后端数据库的程序账号和监控账号。

scheduler
调度器是一个类似于cron的实现,集成在ProxySQL中,具有毫秒的粒度。通过脚本检测来设置ProxySQL。

2)stats库
MySQL [(none)]> show tables from stats;
+--------------------------------------+
| tables |
+--------------------------------------+
| global_variables |
| stats_memory_metrics |
| stats_mysql_commands_counters |
| stats_mysql_connection_pool |
| stats_mysql_connection_pool_reset |
| stats_mysql_global |
| stats_mysql_prepared_statements_info |
| stats_mysql_processlist |
| stats_mysql_query_digest |
| stats_mysql_query_digest_reset |
| stats_mysql_query_rules |
| stats_mysql_users |
| stats_proxysql_servers_checksums |
| stats_proxysql_servers_metrics |
| stats_proxysql_servers_status |
+--------------------------------------+
15 rows in set (0.001 sec)

常用的几个表介绍
===============================================
stats_mysql_commands_counters
统计各种SQL类型的执行次数和时间,通过参数mysql-commands_stats控制开关,默认是ture。

stats_mysql_connection_pool
连接后端MySQL的连接信息。

stats_mysql_processlist
类似MySQL的show processlist的命令,查看各线程的状态。

stats_mysql_query_digest
表示SQL的执行次数、时间消耗等。通过变量mysql-query_digests控制开关,默认是开。

stats_mysql_query_rules
路由命中次数统计。

3)monitor库
MySQL [(none)]> show tables from monitor;
+------------------------------------+
| tables |
+------------------------------------+
| mysql_server_connect_log |
| mysql_server_group_replication_log |
| mysql_server_ping_log |
| mysql_server_read_only_log |
| mysql_server_replication_lag_log |
+------------------------------------+
5 rows in set (0.000 sec)

常用的几个表介绍
===============================================
mysql_server_connect_log
连接到所有MySQL服务器以检查它们是否可用,该表用来存放检测连接的日志。

mysql_server_ping_log
使用mysql_ping API ping后端MySQL服务器,检查它们是否可用,该表用来存放ping的日志。

mysql_server_replication_lag_log
后端MySQL服务主从延迟的检测。

runtime_开头的是运行时的配置,这些是不能修改的。要修改ProxySQL的配置,需要修改了非runtime_表,
修改后必须执行"LOAD ... TO RUNTIME"才能加载到RUNTIME生效,执行save ... to disk才能将配置持久化保存到磁盘。

global_variables 有80多个变量可以设置,其中就包括监听的端口、管理账号、禁用monitor等

1
2
3
4
5
6
7
8
9
10
11
12
13
14
15
16
17
18
19
20
21
22
23
24
25
26
27
28
29
30
31
32
33
34
35
36
37
38
39
40
41
42
43
44
45
46
47
48
49
50
51
52
53
54
55
56
57
58
59
60
61
62
63
64
65
66
67
68
69
70
71
72
73
74
75
76
77
78
(admin@127.0.0.1:6032) [(none)]> show tables;
+--------------------------------------------+
| tables |
+--------------------------------------------+
| global_variables |
| mysql_collations |
| mysql_group_replication_hostgroups |
| mysql_query_rules |
| mysql_query_rules_fast_routing |
| mysql_replication_hostgroups |
| mysql_servers |
| mysql_users |
| proxysql_servers |
| runtime_checksums_values |
| runtime_global_variables |
| runtime_mysql_group_replication_hostgroups |
| runtime_mysql_query_rules |
| runtime_mysql_query_rules_fast_routing |
| runtime_mysql_replication_hostgroups |
| runtime_mysql_servers |
| runtime_mysql_users |
| runtime_proxysql_servers |
| runtime_scheduler |
| scheduler |
+--------------------------------------------+
20 rows in set (0.001 sec)

(admin@127.0.0.1:6032) [(none)]> show tables from stats;
+--------------------------------------+
| tables |
+--------------------------------------+
| global_variables |
| stats_memory_metrics |
| stats_mysql_commands_counters |
| stats_mysql_connection_pool |
| stats_mysql_connection_pool_reset |
| stats_mysql_global |
| stats_mysql_prepared_statements_info |
| stats_mysql_processlist |
| stats_mysql_query_digest |
| stats_mysql_query_digest_reset |
| stats_mysql_query_rules |
| stats_mysql_users |
| stats_proxysql_servers_checksums |
| stats_proxysql_servers_metrics |
| stats_proxysql_servers_status |
+--------------------------------------+
15 rows in set (0.000 sec)

(admin@127.0.0.1:6032) [(none)]> show create table mysql_servers\G;
*************************** 1. row ***************************
table: mysql_servers
Create Table: CREATE TABLE mysql_servers (
hostgroup_id INT CHECK (hostgroup_id>=0) NOT NULL DEFAULT 0,
hostname VARCHAR NOT NULL,
port INT NOT NULL DEFAULT 3306,
status VARCHAR CHECK (UPPER(status) IN ('ONLINE','SHUNNED','OFFLINE_SOFT', 'OFFLINE_HARD')) NOT NULL DEFAULT 'ONLINE',
weight INT CHECK (weight >= 0) NOT NULL DEFAULT 1,
compression INT CHECK (compression >=0 AND compression <= 102400) NOT NULL DEFAULT 0,
max_connections INT CHECK (max_connections >=0) NOT NULL DEFAULT 1000,
max_replication_lag INT CHECK (max_replication_lag >= 0 AND max_replication_lag <= 126144000) NOT NULL DEFAULT 0,
use_ssl INT CHECK (use_ssl IN(0,1)) NOT NULL DEFAULT 0,
max_latency_ms INT UNSIGNED CHECK (max_latency_ms>=0) NOT NULL DEFAULT 0,
comment VARCHAR NOT NULL DEFAULT '',
PRIMARY KEY (hostgroup_id, hostname, port) )
1 row in set (0.000 sec)

ERROR: No query specified

(admin@127.0.0.1:6032) [(none)]> select * from mysql_servers;
+--------------+---------------+------+--------+--------+-------------+-----------------+---------------------+---------+----------------+---------+
| hostgroup_id | hostname | port | status | weight | compression | max_connections | max_replication_lag | use_ssl | max_latency_ms | comment |
+--------------+---------------+------+--------+--------+-------------+-----------------+---------------------+---------+----------------+---------+
| 10 | 172.16.60.211 | 3306 | ONLINE | 1 | 0 | 1000 | 0 | 0 | 0 | |
| 20 | 172.16.60.212 | 3306 | ONLINE | 1 | 0 | 1000 | 0 | 0 | 0 | |
| 20 | 172.16.60.213 | 3306 | ONLINE | 1 | 0 | 1000 | 0 | 0 | 0 | |
+--------------+---------------+------+--------+--------+-------------+-----------------+---------------------+---------+----------------+---------+
3 rows in set (0.000 sec)

- hostgroup_id: ProxySQL通过 hostgroup (下称HG) 的形式组织后端db实例。一个 HG 代表同属于一个角色
- 该表的主键是 (hostgroup_id, hostname, port),可以看到一个 hostname:port 可以在多个hostgroup里面,如上面的 10.0.100.100:3307,这样可以避免 HG 1000 的从库全都不可用时,依然可以把读请求发到主库上。
- 一个 HG 可以有多个实例,即多个从库,可以通过 weight 分配权重
- hostgroup_id 0 是一个特殊的HG,路由查询的时候,没有匹配到规则则默认选择 HG 0
- status:
- ONLINE: 当前后端实例状态正常
- SHUNNED: 临时被剔除,可能因为后端 too many connections error,或者超过了可容忍延迟阀值 max_replication_lag
- OFFLINE_SOFT: “软离线”状态,不再接受新的连接,但已建立的连接会等待活跃事务完成。
- OFFLINE_HARD: “硬离线”状态,不再接受新的连接,已建立的连接或被强制中断。当后端实例宕机或网络不可达,会出现。
- max_connections: 允许连接到该后端mysql实例的最大连接数。不要大于MySQL设置的 max_connections,如果后端实例 hostname:port 在多个 hostgroup 里,以较大者为准,而不是各自独立允许的最大连接数。
- max_replication_lag: 允许的最大延迟,主库不受这个影响,默认0。如果 > 0, monitor 模块监控主从延迟大于阀值时,会临时把它变为 SHUNNED 。
- max_latency_ms: mysql_ping 响应时间,大于这个阀值会把它从连接池剔除(即使是ONLINE)
- comment: 备注,不建议留空。可以通过它的内容如json格式的数据,配合自己写的check脚本,完成一些自动化的工作。

表 mysql_users

1
2
3
4
5
6
7
8
9
10
11
12
13
14
15
16
17
18
19
20
21
22
23
24
25
26
27
28
29
30
31
32
33
34
35
36
37
38
39
40
41
42
43
44
MySQL [(none)]> show create table mysql_users\G;
*************************** 1. row ***************************
table: mysql_users
Create Table: CREATE TABLE mysql_users (
username VARCHAR NOT NULL,
password VARCHAR,
active INT CHECK (active IN (0,1)) NOT NULL DEFAULT 1,
use_ssl INT CHECK (use_ssl IN (0,1)) NOT NULL DEFAULT 0,
default_hostgroup INT NOT NULL DEFAULT 0,
default_schema VARCHAR,
schema_locked INT CHECK (schema_locked IN (0,1)) NOT NULL DEFAULT 0,
transaction_persistent INT CHECK (transaction_persistent IN (0,1)) NOT NULL DEFAULT 1,
fast_forward INT CHECK (fast_forward IN (0,1)) NOT NULL DEFAULT 0,
backend INT CHECK (backend IN (0,1)) NOT NULL DEFAULT 1,
frontend INT CHECK (frontend IN (0,1)) NOT NULL DEFAULT 1,
max_connections INT CHECK (max_connections >=0) NOT NULL DEFAULT 10000,
PRIMARY KEY (username, backend),
UNIQUE (username, frontend))
1 row in set (0.000 sec)

ERROR: No query specified

MySQL [(none)]> select * from mysql_users;
+-----------+------------+--------+---------+-------------------+----------------+---------------+------------------------+--------------+---------+----------+-----------------+
| username | password | active | use_ssl | default_hostgroup | default_schema | schema_locked | transaction_persistent | fast_forward | backend | frontend | max_connections |
+-----------+------------+--------+---------+-------------------+----------------+---------------+------------------------+--------------+---------+----------+-----------------+
| proxysql | proxysql | 1 | 0 | 2 | NULL | 0 | 1 | 0 | 1 | 1 | 10000 |
| root | passwd | 1 | 0 | 10 | NULL | 0 | 1 | 0 | 1 | 1 | 10000 |
| sqlsender | P@ssword1! | 1 | 0 | 10 | NULL | 0 | 1 | 0 | 1 | 1 | 10000 |
+-----------+------------+--------+---------+-------------------+----------------+---------------+------------------------+--------------+---------+----------+-----------------+
3 rows in set (0.000 sec)

MySQL [(none)]> select username,password,transaction_persistent,active,backend,frontend,max_connections from runtime_mysql_users;
+-----------+-------------------------------------------+------------------------+--------+---------+----------+-----------------+
| username | password | transaction_persistent | active | backend | frontend | max_connections |
+-----------+-------------------------------------------+------------------------+--------+---------+----------+-----------------+
| proxysql | *BF27B4C7AAD278126E228AA8427806E870F64F39 | 1 | 1 | 0 | 1 | 10000 |
| root | *59C70DA2F3E3A5BDF46B68F5C8B8F25762BCCEF0 | 1 | 1 | 0 | 1 | 10000 |
| sqlsender | *50572A5FABC7DA9CEE5EB5977EDDE59E38967422 | 1 | 1 | 0 | 1 | 10000 |
| proxysql | *BF27B4C7AAD278126E228AA8427806E870F64F39 | 1 | 1 | 1 | 0 | 10000 |
| root | *59C70DA2F3E3A5BDF46B68F5C8B8F25762BCCEF0 | 1 | 1 | 1 | 0 | 10000 |
| sqlsender | *50572A5FABC7DA9CEE5EB5977EDDE59E38967422 | 1 | 1 | 1 | 0 | 10000 |
+-----------+-------------------------------------------+------------------------+--------+---------+----------+-----------------+
6 rows in set (0.001 sec)

- username, password: 连接后端db的用户密码。
这个密码你可以插入明文,也可以插入hash加密后的密文,proxysql会检查你插入的时候密码是否以 * 开头来判断,而且密文要在其它地方使用 PASSWORD()生成。但到 runtime_mysql_users 里,都统一变成了密文,所以可以明文插入,再 SAVE MYSQL USERS TO MEM,此时看到的也是HASH密文。
- active: 是否生效该用户。
- default_hostgroup: 这个用户的请求没有匹配到规则时,默认发到这个 hostgroup,默认0
- default_schema: 这个用户连接时没有指定 database name 时,默认使用的schema
注意表面上看默认为NULL,但实际上受到变量 mysql-default_schema 的影响,默认为 information_schema。关于这个参考我所提的 issue #988
- transaction_persistent: 如果设置为1,连接上ProxySQL的会话后,如果在一个hostgroup上开启了事务,那么后续的sql都继续维持在这个hostgroup上,不伦是否会匹配上其它路由规则,直到事务结束。
虽然默认是0,但我建议还是设成1,虽然一般来说由于前段应用的空值,为0出问题的情况几乎很小。作者也在考虑默认设成 1,refer this issue #793
- frontend, backend: 目前版本这两个都需要使用默认的1,将来有可能会把 Client -> ProxySQL (frontend) 与 ProxySQL -> BackendDB (backend)的认证分开。从 runtime_mysql_users 表内容看到,记录数比 mysql_users 多了一倍,就是把前端认证与后端认证独立出来的结果。
- fast_forward: 忽略查询重写/缓存层,直接把这个用户的请求透传到后端DB。相当于只用它的连接池功能,一般不用,路由规则 .* 就行了。

表 mysql_replication_hostgroups

1
2
3
4
5
6
7
8
9
10
11
12
13
14
15
16
17
18
MySQL [(none)]> show create table mysql_replication_hostgroups\G;
*************************** 1. row ***************************
table: mysql_replication_hostgroups
Create Table: CREATE TABLE mysql_replication_hostgroups (
writer_hostgroup INT CHECK (writer_hostgroup>=0) NOT NULL PRIMARY KEY,
reader_hostgroup INT NOT NULL CHECK (reader_hostgroup<>writer_hostgroup AND reader_hostgroup>0),
comment VARCHAR NOT NULL DEFAULT '', UNIQUE (reader_hostgroup))
1 row in set (0.001 sec)

ERROR: No query specified

MySQL [(none)]> select * from mysql_replication_hostgroups;
+------------------+------------------+---------+
| writer_hostgroup | reader_hostgroup | comment |
+------------------+------------------+---------+
| 10 | 20 | 1 |
+------------------+------------------+---------+
1 row in set (0.000 sec)

定义 hostgroup 的主从关系。ProxySQL monitor 模块会监控 HG 后端所有servers 的 read_only 变量,如果发现从库的 read_only 变为0、主库变为1,则认为角色互换了,自动改写 mysql_servers 表里面 hostgroup 关系,达到自动 Failover 效果。

表 mysql_query_rules
mysql_query_rules 是ProxySQL非常核心一个表,定义查询路由规则

1
2
3
4
5
6
7
8
9
10
11
12
13
14
15
16
17
18
19
20
21
22
23
24
25
26
27
28
29
30
31
32
33
34
35
36
37
38
39
40
41
42
43
44
45
46
47
MySQL [(none)]> show create table mysql_query_rules\G;
*************************** 1. row ***************************
table: mysql_query_rules
Create Table: CREATE TABLE mysql_query_rules (
rule_id INTEGER PRIMARY KEY AUTOINCREMENT NOT NULL,
active INT CHECK (active IN (0,1)) NOT NULL DEFAULT 0,
username VARCHAR,
schemaname VARCHAR,
flagIN INT NOT NULL DEFAULT 0,
client_addr VARCHAR,
proxy_addr VARCHAR,
proxy_port INT,
digest VARCHAR,
match_digest VARCHAR,
match_pattern VARCHAR,
negate_match_pattern INT CHECK (negate_match_pattern IN (0,1)) NOT NULL DEFAULT 0,
re_modifiers VARCHAR DEFAULT 'CASELESS',
flagOUT INT,
replace_pattern VARCHAR,
destination_hostgroup INT DEFAULT NULL,
cache_ttl INT CHECK(cache_ttl > 0),
reconnect INT CHECK (reconnect IN (0,1)) DEFAULT NULL,
timeout INT UNSIGNED,
retries INT CHECK (retries>=0 AND retries <=1000),
delay INT UNSIGNED,
next_query_flagIN INT UNSIGNED,
mirror_flagOUT INT UNSIGNED,
mirror_hostgroup INT UNSIGNED,
error_msg VARCHAR,
OK_msg VARCHAR,
sticky_conn INT CHECK (sticky_conn IN (0,1)),
multiplex INT CHECK (multiplex IN (0,1,2)),
log INT CHECK (log IN (0,1)),
apply INT CHECK(apply IN (0,1)) NOT NULL DEFAULT 0,
comment VARCHAR)
1 row in set (0.001 sec)

ERROR: No query specified

MySQL [(none)]> select * from mysql_query_rules;
+---------+--------+----------+------------+--------+-------------+------------+------------+--------+----------------------+---------------+----------------------+--------------+---------+-----------------+-----------------------+-----------+-----------+---------+---------+-------+-------------------+----------------+------------------+-----------+--------+-------------+-----------+-----+-------+---------+
| rule_id | active | username | schemaname | flagIN | client_addr | proxy_addr | proxy_port | digest | match_digest | match_pattern | negate_match_pattern | re_modifiers | flagOUT | replace_pattern | destination_hostgroup | cache_ttl | reconnect | timeout | retries | delay | next_query_flagIN | mirror_flagOUT | mirror_hostgroup | error_msg | OK_msg | sticky_conn | multiplex | log | apply | comment |
+---------+--------+----------+------------+--------+-------------+------------+------------+--------+----------------------+---------------+----------------------+--------------+---------+-----------------+-----------------------+-----------+-----------+---------+---------+-------+-------------------+----------------+------------------+-----------+--------+-------------+-----------+-----+-------+---------+
| 1 | 1 | NULL | NULL | 0 | NULL | NULL | NULL | NULL | ^SELECT.*FOR UPDATE$ | NULL | 0 | CASELESS | NULL | NULL | 10 | NULL | NULL | NULL | NULL | NULL | NULL | NULL | NULL | NULL | NULL | NULL | NULL | NULL | 1 | NULL |
| 2 | 1 | NULL | NULL | 0 | NULL | NULL | NULL | NULL | ^SELECT | NULL | 0 | CASELESS | NULL | NULL | 20 | NULL | NULL | NULL | NULL | NULL | NULL | NULL | NULL | NULL | NULL | NULL | NULL | NULL | 1 | NULL |
+---------+--------+----------+------------+--------+-------------+------------+------------+--------+----------------------+---------------+----------------------+--------------+---------+-----------------+-----------------------+-----------+-----------+---------+---------+-------+-------------------+----------------+------------------+-----------+--------+-------------+-----------+-----+-------+---------+
2 rows in set (0.000 sec)

- rule_id: 表主键,自增。规则处理是以 rule_id 的顺序进行。
- active: 只有 active=1 的规则才会参与匹配。
- username: 如果非 NULL,只有连接用户是 username 的值才会匹配。
- schemaname: 如果非 NULL,只有查询连接使用的db是 schemaname 的值才会匹配。
注意如果是 NULL,不代表连接没有使用schema,而是不伦任何schema都进一步匹配。
- flagIN, flagOUT, apply: 用来定义路由链 chains of rules。
- 首先会检查 flagIN=0 的规则,以rule_id的顺序;如果都没匹配上,则走这个用户的 default_hostgroup。
- 当匹配一条规则后,会检查 flagOUT。
- 如果不为NULL,并且 flagIN != flagOUT ,则进入以flagIN为上一个flagOUT值的新规则链。
- 如果不为NULL,并且 flagIN = flagOUT,则应用这条规则。
- 如果为NULL,或者 apply=1,则结束,应用这条规则。
- 如果最终没有匹配到,则找到这个用户的 default_hostgroup。
- client_addr: 匹配客户端来源IP
- proxy_addr, proxy_port: 匹配本地proxysql的IP、端口。我目前没有想到它的应用场景,可能是把proxysql监听在多个接口上,分发到不同的业务?
- digest: 精确的匹配一类查询。
- match_digest: 正则匹配一类查询。query digest 是指对查询去掉具体值后进行“模糊化”后的查询,类似 pt-fingerprint / pt-query-digest 的效果。
- match_pattern: 正则匹配查询。

以上都是匹配查询的规则,1.3.5版本使用的正则引擎只有 RE2 ,1.4版本可以通过变量 mysql-query_processor_regex 设置 RE2 或者 PCRE,且1.4开始默认是PCRE。
推荐用 match_digest 。关于每条查询都会计算digest对性能的影响,计算query digest确实会有性能损失,但是这却是proxysql里面非常重要的特性,主要是两点:
- proxysql无法知道连接复用(multipexing)是否必须被自动禁用,比如连接里面有variables/tmp tables/lock table等特殊命令,是不能复用的。
- 完整的查询去匹配正则的效率,一般没有参数化后的查询匹配效率高,因为有很长的字符串内容需要处理。再者,SELECT * FROM randomtable WHERE comment LIKE ‘%INTO sbtest1 % FROM sbtest2 %’字符串里有类似这样的语句,很难排除误匹配。
- negate_match_pattern: 反向匹配,相当于对 match_digest/match_pattern 的匹配取反。
- re_modifiers: 修改正则匹配的参数,比如默认的:忽略大小写CASELESS、禁用GLOBAL.

上面都是匹配规则,下面是匹配后的行为
- replace_pattern: 查询重写,默认为空,不rewrite。
- rewrite规则要遵守 RE2::Replace 。
destination_hostgroup: 路由查询到这个 hostgroup。当然如果用户显式 start transaction 且 transaction_persistent=1,那么即使匹配到了,也依然按照事务里第一条sql的路由规则去走。
- cache_ttl: 查询结果缓存的毫秒数。
proxysql这个 Query Cache 与 MySQL 自带的query cache不是同一个。proxysql query cache也不会关心后端数据是否被修改,它所做的就是针对某些特定种类的查询结果进行缓存,比如一些历史数据的count结果。一般不设。
- timeout: 这一类查询执行的最大时间(毫秒),超时则自动kill。
这是对后端DB的保护机制,相当于阿里云RDS loose_max_statement_time 变量的功能,但是注意不同的是,阿里云这个变量的时间时不包括DML操作出现InnoDB行锁等待的时间,而ProxySQL的这个 timeout 是计算从发送sql到等待响应的时间。默认mysql-default_query_timeout给的是 10h .
- retries: 语句在执行时失败时,重试次数。默认由 mysql-query_retries_on_failure变量指定,为1 。
个人建议把它设成0,即不重试。因为执行失败,对select而言很少见,主要是dml,但自己重试对数据不放心。
- delay: 查询延迟执行,这是ProxySQL提供的限流机制,会让其它的查询优先执行。
默认值 mysql-default_query_delay,为0。我们一般不用,其实还是要配合应用端使用,比如这边延迟执行,但上层等待你返回,那前端不就堵住了,没准出现雪崩效应。
- mirror_flagOUT,mirror_hostgroup
这两个高级了,目前这部分文档不全,功能是SQL镜像。顾名思义,就是把匹配到的SQL除了发送到 destination_hostgroup,同时镜像一份到这里的hostgroup,比如我们的测试库。比如这种场景,数据库要从5.6升级到5.7,要验证现有查询语句对5.7的适用情况,就可以把生产流量镜像到5.7新库上验证。
- error_msg: 默认为NULL,如果指定了则这个查询直接被 block 掉,马上返回这个错误信息。
这个功能也很实用,比如线上突然冒出一个 “坏查询”,应用端不方便马上发版解决,我们就可以在这配置一个规则,把查询屏蔽掉,想正常的mysql报错那样抛异常。下一篇文章有演示。
- multiplex: 连接是否复用。
- log: 是否记录查询日志。可以看到log是否记录的对象是根据规则。
要开启日志记录,需要设置变量 mysql-eventslog_filename 来指定文件名,然后这个 log 标记为1。但是目前proxysql记录的日志是二进制格式,需要特定的工具才能读取: eventslog_reader_sample 。这个工具在源码目录 tools下面。

proxysql对后端server健康检查

1
2
3
4
5
6
7
8
9
10
11
12
13
14
15
16
17
18
19
20
21
22
23
24
25
26
27
28
MySQL [monitor]> show variables like "mysql-monitor%";
+-----------------------------------------------------+------------+
| Variable_name | Value |
+-----------------------------------------------------+------------+
| mysql-monitor_enabled | true |
| mysql-monitor_connect_timeout | 600 |
| mysql-monitor_ping_max_failures | 3 |
| mysql-monitor_ping_timeout | 1000 |
| mysql-monitor_read_only_max_timeout_count | 3 |
| mysql-monitor_replication_lag_interval | 10000 |
| mysql-monitor_replication_lag_timeout | 1000 |
| mysql-monitor_groupreplication_healthcheck_interval | 5000 |
| mysql-monitor_groupreplication_healthcheck_timeout | 800 |
| mysql-monitor_replication_lag_use_percona_heartbeat | |
| mysql-monitor_query_interval | 60000 |
| mysql-monitor_query_timeout | 100 |
| mysql-monitor_slave_lag_when_null | 60 |
| mysql-monitor_wait_timeout | true |
| mysql-monitor_writer_is_also_reader | true |
| mysql-monitor_username | monitor |
| mysql-monitor_password | P@ssword1! |
| mysql-monitor_history | 600000 |
| mysql-monitor_connect_interval | 60000 |
| mysql-monitor_ping_interval | 10000 |
| mysql-monitor_read_only_interval | 1500 |
| mysql-monitor_read_only_timeout | 500 |
+-----------------------------------------------------+------------+
22 rows in set (0.001 sec)

ProxySQL配置后端DB server

两种方式,区别在于

1) 一种是在往mysql_servers表中添加server时就为其划分好hostgroup_id(例如0表示写组,1表示读组)
2) 另一种往mysql_servers表中添加server时不区分hostgroup_id(例如全部设为0),然后通过mysql_replication_hostgroups表中的值,
根据proxysql检测到的各server的read_only变量值来自动为后端server设置hostgroup_id

这里强烈推荐用第一种方式
因为第一种是完全由我们控制的;而第二种假如我们误将读server的read_only属性设置为0,则proxysql会将其重新分配到写组,这绝对是不期望的。

ProxySQL下添加与修改配置

1
2
3
4
5
6
7
8
9
10
11
12
13
14
15
16
17
18
19
20
21
22
23
24
25
26
27
28
29
30
31
32
33
34
35
36
37
38
1) 添加配置
需要添加配置时,直接操作的是MEMORAY,例如:添加一个程序用户,在mysql_users表中执行一个插入操作:
MySQL [(none)]> insert into mysql_users(username,password,active,default_hostgroup,transaction_persistent) values('myadmin','mypass',1,0,1);

这样就完成了一个用户的添加。要让这个insert生效,还需要执行如下操作:
MySQL [(none)]>load mysql users to runtime;
表示将修改后的配置(MEMORY层)用到实际生产环境(RUNTIME层)

如果想保存这个设置永久生效,还需要执行如下操作:
MySQL [(none)]>save mysql users to disk;
表示将memoery中的配置保存到磁盘中去。

除了上面两个操作,还可以执行如下操作:
MySQL [(none)]>load mysql users to memory;
表示将磁盘中持久化的配置拉一份到memory中来。

MySQL [(none)]>load mysql users from config;
表示将配置文件中的配置加载到memeory中。

2) 持久化配置
以上SQL命令是对mysql_users进行的操作,同理,还可以对mysql_servers表、mysql_query_rules表、global_variables表等执行类似的操作。
如对mysql_servers表插入完成数据后,要执行保存和加载操作,可执行如下SQL命令:
MySQL [(none)]> load mysql servers to runtime;
MySQL [(none)]> save mysql servers to disk;

对mysql_query_rules表插入完成数据后,要执行保存和加载操作,可执行如下SQL命令:
MySQL [(none)]> load mysql query rules to runtime;
MySQL [(none)]> save mysql query rules to disk;

对global_variables表插入完成数据后,要执行保存和加载操作,可执行如下SQL命令:

以下命令加载或保存mysql variables(global_variables):
MySQL [(none)]>load mysql variables to runtime;
MySQL [(none)]>save mysql variables to disk;

以下命令加载或保存admin variables(select * from global_variables where variable_name like 'admin-%'):
MySQL [(none)]> load admin variables to runtime;
MySQL [(none)]>save admin variables to disk;

实战功能验证

针对GTID模式的主从同步,另两个从库都要设置read_only=on
接下来通过实战操作来全面了解一下 ProxySQL 的特性和使用场景。

实验环境

1
2
3
4
5
6
7
8
9
10
11
12
13
14
15
16
17
18
19
20
21
22
23
24
25
26
27
28
29
30
31
32
33
34
35
36
172.16.60.211    mysql-master       安装Mysql5.7
172.16.60.212 mysql-slave1 安装Mysql5.7
172.16.60.213 mysql-slave2 安装Mysql5.7
172.16.60.214 mysql-proxy 安装ProxySQL,Mysql-client

系统都是CentOS7.5,MySQL版本是5.7,准备一主两从架构(基于GTID的同步,两个从库都要开启read_only=on)来配合ProxySQL。
[root@mysql-master ~]# cat /etc/redhat-release
CentOS Linux release 7.5.1804 (Core)

1) 三个节点各自设置主机名
[root@mysql-master ~]# hostnamectl --static set-hostname mysql-master
[root@mysql-master ~]# hostname
mysql-master

[root@mysql-slave1 ~]# hostnamectl --static set-hostname mysql-slave1
[root@mysql-slave1 ~]# hostname
mysql-slave

[root@mysql-slave2 ~]# hostnamectl --static set-hostname mysql-slave2
[root@mysql-slave2 ~]# hostname
mysql-slave

[root@mysql-proxy ~]# hostnamectl --static set-hostname mysql-proxy
[root@mysql-proxy ~]# hostname
mysql-proxy

2) 所有节点关闭selinux和iptables防火墙
[root@mysql-master ~]# setenforce 0
[root@mysql-master ~]# cat /etc/sysconfig/selinux |grep "SELINUX=disabled"
SELINUX=disabled

[root@mysql-master ~]# iptables -F
[root@mysql-master ~]# systemctl disable firewalld
[root@mysql-master ~]# systemctl stop firewalld
[root@mysql-master ~]# firewall-cmd --state
not running

安装Mysql 5.7 (在三个mysql节点上安装)

1
2
3
4
5
6
7
8
9
10
11
12
13
14
15
16
17
18
19
20
21
22
23
24
25
26
27
28
29
30
31
32
33
34
35
36
37
38
39
40
41
42
43
44
45
46
47
48
49
50
51
52
53
在三个mysql节点机上使用yum方式安装Mysql5.7,参考:https://www.cnblogs.com/kevingrace/p/8340690.html

安装MySQL yum资源库
[root@mysql-master ~]# yum localinstall https://dev.mysql.com/get/mysql57-community-release-el7-8.noarch.rpm

安装MySQL 5.7
[root@mysql-master ~]# yum install -y mysql-community-server

启动MySQL服务器和MySQL的自动启动
[root@mysql-master ~]# systemctl start mysqld.service
[root@mysql-master ~]# systemctl enable mysqld.service

设置登录密码
由于MySQL从5.7开始不允许首次安装后使用空密码进行登录!为了加强安全性,系统会随机生成一个密码以供管理员首次登录使用,
这个密码记录在/var/log/mysqld.log文件中,使用下面的命令可以查看此密码:
[root@mysql-master ~]# cat /var/log/mysqld.log|grep 'A temporary password'
2019-01-11T05:53:17.824073Z 1 [Note] A temporary password is generated for root@localhost: TaN.k:*Qw2xs

使用上面查看的密码TaN.k:*Qw2xs 登录mysql,并重置密码为123456
[root@mysql-master ~]# mysql -p #输入默认的密码:TaN.k:*Qw2xs
.............
mysql> set global validate_password_policy=0;
Query OK, 0 rows affected (0.00 sec)

mysql> set global validate_password_length=1;
Query OK, 0 rows affected (0.00 sec)

mysql> set password=password("123456");
Query OK, 0 rows affected, 1 warning (0.00 sec)

mysql> flush privileges;
Query OK, 0 rows affected (0.00 sec)

查看mysql版本
[root@mysql-master ~]# mysql -p123456
........
mysql> select version();
+-----------+
| version() |
+-----------+
| 5.7.24 |
+-----------+
1 row in set (0.00 sec)

=====================================================================
温馨提示
mysql5.7通过上面默认安装后,执行语句可能会报错:
ERROR 1819 (HY000): Your password does not satisfy the current policy requirements

这个报错与Mysql 密码安全策略validate_password_policy的值有关,validate_password_policy可以取0、1、2三个值:
解决办法:
set global validate_password_policy=0;
set global validate_password_length=1;

*配置Mysql基于GTID的主从同步 *

在mysql-master 和 mysql-slave1、mysql-slave2节点上

1
2
3
4
5
6
7
8
9
10
11
12
13
14
15
16
17
18
19
20
21
22
23
24
25
26
27
28
29
30
31
32
33
34
35
36
37
38
39
40
41
42
43
44
45
46
47
48
49
50
51
52
53
54
55
56
57
58
59
60
61
62
63
64
65
66
67
68
69
70
71
72
73
74
75
76
77
78
79
80
81
82
83
84
85
86
87
88
89
90
91
92
93
94
95
96
97
98
99
100
101
102
103
104
105
106
107
108
109
110
111
112
113
114
115
116
117
118
119
120
121
122
123
124
125
126
127
128
129
130
131
132
133
134
135
136
137
138
139
140
141
142
143
144
145
146
147
148
149
150
151
152
153
154
155
156
157
158
159
160
161
162
163
164
165
166
167
168
169
170
171
172
173
174
175
176
177
178
179
180
181
182
183
184
185
186
187
188
189
190
191
192
193
194
195
196
197
198
199
200
201
202
203
204
205
206
207
208
209
210
211
212
213
214
215
216
217
218
219
220
221
222
223
224
225
226
227
228
229
230
231
232
233
234
235
236
237
238
239
240
241
242
243
244
245
246
247
248
249
250
251
252
253
254
255
256
257
258
259
260
261
262
263
264
265
266
267
268
269
270
271
272
273
274
275
276
277
278
279
280
281
282
283
284
285
286
287
288
289
290
291
292
293
294
295
296
297
298
299
300
301
302
303
304
305
306
307
308
309
310
311
312
313
314
315
316
317
318
319
320
321
322
323
324
325
326
327
328
329
330
331
332
333
334
335
336
337
338
339
340
341
342
343
344
345
346
347
348
349
350
351
352
353
354
355
356
357
358
359
360
361
362
363
364
365
366
367
368
369
370
371
372
373
374
375
376
377
378
379
380
381
382
383
384
385
386
387
388
389
390
391
392
1) 主数据库mysql-master (172.16.60.211)的配置操作
[root@mysql-master ~]# >/etc/my.cnf
[root@mysql-master ~]# vim /etc/my.cnf
[mysqld]
datadir = /var/lib/mysql
socket = /var/lib/mysql/mysql.sock

symbolic-links = 0

log-error = /var/log/mysqld.log
pid-file = /var/run/mysqld/mysqld.pid

#GTID:
server_id = 1
gtid_mode = on
enforce_gtid_consistency = on

#binlog
log_bin = master-bin
log-slave-updates = 1
binlog_format = row
sync-master-info = 1
sync_binlog = 1

#relay log
skip_slave_start = 1

配置完成之后,别忘了重启Mysql
[root@mysql-master ~]# systemctl restart mysqld

登录mysql,查看一下master状态, 发现多了一项"Executed_Gtid_Set "
[root@mysql-master ~]# mysql -p123456
.........
mysql> show master status;
+-------------------+----------+--------------+------------------+------------------------------------------+
| File | Position | Binlog_Do_DB | Binlog_Ignore_DB | Executed_Gtid_Set |
+-------------------+----------+--------------+------------------+------------------------------------------+
| master-bin.000002 | 550 | | | fc39b161-22ca-11e9-a638-005056ac6820:1-2 |
+-------------------+----------+--------------+------------------+------------------------------------------+
1 row in set (0.00 sec)

mysql> show global variables like '%uuid%';
+---------------+--------------------------------------+
| Variable_name | Value |
+---------------+--------------------------------------+
| server_uuid | fc39b161-22ca-11e9-a638-005056ac6820 |
+---------------+--------------------------------------+
1 row in set (0.00 sec)

mysql> show global variables like '%gtid%';
+----------------------------------+------------------------------------------+
| Variable_name | Value |
+----------------------------------+------------------------------------------+
| binlog_gtid_simple_recovery | ON |
| enforce_gtid_consistency | ON |
| gtid_executed | fc39b161-22ca-11e9-a638-005056ac6820:1-2 |
| gtid_executed_compression_period | 1000 |
| gtid_mode | ON |
| gtid_owned | |
| gtid_purged | |
| session_track_gtids | OFF |
+----------------------------------+------------------------------------------+
8 rows in set (0.00 sec)

主库执行从库复制授权
mysql> grant replication slave,replication client on *.* to slave@'172.16.60.212' identified by "slave@123";
Query OK, 0 rows affected, 1 warning (0.09 sec)

mysql> grant replication slave,replication client on *.* to slave@'172.16.60.213' identified by "slave@123";
Query OK, 0 rows affected, 1 warning (0.03 sec)

mysql> flush privileges;
Query OK, 0 rows affected (0.03 sec)


mysql> show grants for slave@'172.16.60.212';
+-------------------------------------------------------------------------------+
| Grants for slave@172.16.60.212 |
+-------------------------------------------------------------------------------+
| GRANT REPLICATION SLAVE, REPLICATION CLIENT ON *.* TO 'slave'@'172.16.60.212' |
+-------------------------------------------------------------------------------+
1 row in set (0.00 sec)

mysql> show grants for slave@'172.16.60.213';
+-------------------------------------------------------------------------------+
| Grants for slave@172.16.60.213 |
+-------------------------------------------------------------------------------+
| GRANT REPLICATION SLAVE, REPLICATION CLIENT ON *.* TO 'slave'@'172.16.60.213' |
+-------------------------------------------------------------------------------+
1 row in set (0.00 sec)

在主数据库机器上创建一个测试库kevin(为了测试效果)
mysql> show databases;
+--------------------+
| Database |
+--------------------+
| information_schema |
| mysql |
| performance_schema |
| sys |
+--------------------+
4 rows in set (0.00 sec)

mysql> CREATE DATABASE kevin CHARACTER SET utf8 COLLATE utf8_general_ci;
Query OK, 1 row affected (0.02 sec)

mysql> use kevin;
Database changed
mysql> create table if not exists haha (id int(10) PRIMARY KEY AUTO_INCREMENT,name varchar(50) NOT NULL);
Query OK, 0 rows affected (0.17 sec)

mysql> insert into kevin.haha values(1,"congcong"),(2,"huihui"),(3,"grace");
Query OK, 3 rows affected (0.16 sec)
Records: 3 Duplicates: 0 Warnings: 0

mysql> select * from kevin.haha;
+----+----------+
| id | name |
+----+----------+
| 1 | congcong |
| 2 | huihui |
| 3 | grace |
+----+----------+
3 rows in set (0.00 sec)

2) 从数据库mysql-slave1 (172.16.60.212)的配置操作
与主服务器配置大概一致,除了server_id不一致外,从服务器还可以在配置文件里面添加:"read_only=on" ,
使从服务器只能进行读取操作,此参数对超级用户无效,并且不会影响从服务器的复制;
[root@mysql-slave1 ~]# >/etc/my.cnf
[root@mysql-slave1 ~]# vim /etc/my.cnf
[mysqld]
datadir = /var/lib/mysql
socket = /var/lib/mysql/mysql.sock

symbolic-links = 0

log-error = /var/log/mysqld.log
pid-file = /var/run/mysqld/mysqld.pid

#GTID:
server_id = 2
gtid_mode = on
enforce_gtid_consistency = on

#binlog
log_bin = master-bin
log-slave-updates = 1
binlog_format = row
sync-master-info = 1
sync_binlog = 1

#relay log
skip_slave_start = 1
read_only = on

配置完成之后,别忘了重启Mysql
[root@mysql-slave1 ~]# systemctl restart mysqld

接着登录mysql,做主从同步
[root@mysql-slave1 ~]# mysql -p123456
........
mysql> show databases;
+--------------------+
| Database |
+--------------------+
| information_schema |
| mysql |
| performance_schema |
| test |
+--------------------+
4 rows in set (0.00 sec)

在从数据库里,使用change master 配置主从复制
mysql> stop slave;
Query OK, 0 rows affected, 1 warning (0.00 sec)

mysql> change master to master_host='172.16.60.211',master_user='slave',master_password='slave@123',master_auto_position=1;
Query OK, 0 rows affected, 2 warnings (0.24 sec)

mysql> start slave;
Query OK, 0 rows affected (0.02 sec)

mysql> show slave status \G;
*************************** 1. row ***************************
Slave_IO_State: Waiting for master to send event
Master_Host: 172.16.60.211
Master_User: slave
Master_Port: 3306
Connect_Retry: 60
Master_Log_File: master-bin.000002
Read_Master_Log_Pos: 2069
Relay_Log_File: mysql-slave1-relay-bin.000002
Relay_Log_Pos: 2284
Relay_Master_Log_File: master-bin.000002
Slave_IO_Running: Yes
Slave_SQL_Running: Yes
............
............
Retrieved_Gtid_Set: fc39b161-22ca-11e9-a638-005056ac6820:1-8
Executed_Gtid_Set: 2afbc2f5-22cb-11e9-b9c0-00505688047c:1-2,
fc39b161-22ca-11e9-a638-005056ac6820:1-8
Auto_Position: 1
Replicate_Rewrite_DB:
Channel_Name:
Master_TLS_Version:
1 row in set (0.00 sec)

ERROR:
No query specified

查看从库的gtid
mysql> show global variables like '%gtid%';
+----------------------------------+------------------------------------------------------------------------------------+
| Variable_name | Value |
+----------------------------------+------------------------------------------------------------------------------------+
| binlog_gtid_simple_recovery | ON |
| enforce_gtid_consistency | ON |
| gtid_executed | 2afbc2f5-22cb-11e9-b9c0-00505688047c:1-2,
fc39b161-22ca-11e9-a638-005056ac6820:1-8 |
| gtid_executed_compression_period | 1000 |
| gtid_mode | ON |
| gtid_owned | |
| gtid_purged | 2afbc2f5-22cb-11e9-b9c0-00505688047c:1-2 |
| session_track_gtids | OFF |
+----------------------------------+------------------------------------------------------------------------------------+
8 rows in set (0.01 sec)

接着查看从数据库的数据,发现kevin库已经同步过来了!
mysql> show databases;
+--------------------+
| Database |
+--------------------+
| information_schema |
| kevin |
| mysql |
| performance_schema |
| sys |
+--------------------+
5 rows in set (0.00 sec)

mysql> select * from kevin.haha;
+----+----------+
| id | name |
+----+----------+
| 1 | congcong |
| 2 | huihui |
| 3 | grace |
+----+----------+
3 rows in set (0.00 sec)

3) 从数据库mysql-slave2 (172.16.60.213)的配置操作
[root@mysql-slave2 ~]# >/etc/my.cnf
[root@mysql-slave2 ~]# vim /etc/my.cnf
[mysqld]
datadir = /var/lib/mysql
socket = /var/lib/mysql/mysql.sock

symbolic-links = 0

log-error = /var/log/mysqld.log
pid-file = /var/run/mysqld/mysqld.pid

#GTID:
server_id = 3
gtid_mode = on
enforce_gtid_consistency = on

#binlog
log_bin = master-bin
log-slave-updates = 1
binlog_format = row
sync-master-info = 1
sync_binlog = 1

#relay log
skip_slave_start = 1
read_only = on

重启mysqld
[root@mysql-slave2 ~]# systemctl restart mysqld

登录mysql,做主从复制
[root@mysql-slave2 ~]# mysql -p123456
.........
mysql> stop slave;
Query OK, 0 rows affected, 1 warning (0.00 sec)

mysql> change master to master_host='172.16.60.211',master_user='slave',master_password='slave@123',master_auto_position=1;
Query OK, 0 rows affected, 2 warnings (0.17 sec)

mysql> start slave;
Query OK, 0 rows affected (0.01 sec)

mysql> show slave status \G;
*************************** 1. row ***************************
Slave_IO_State: Waiting for master to send event
Master_Host: 172.16.60.211
Master_User: slave
Master_Port: 3306
Connect_Retry: 60
Master_Log_File: master-bin.000002
Read_Master_Log_Pos: 2069
Relay_Log_File: mysql-slave2-relay-bin.000002
Relay_Log_Pos: 2284
Relay_Master_Log_File: master-bin.000002
Slave_IO_Running: Yes
Slave_SQL_Running: Yes
..........
..........
Retrieved_Gtid_Set: fc39b161-22ca-11e9-a638-005056ac6820:1-8
Executed_Gtid_Set: 26e410b4-22cb-11e9-be44-005056880888:1-2,
fc39b161-22ca-11e9-a638-005056ac6820:1-8
Auto_Position: 1
Replicate_Rewrite_DB:
Channel_Name:
Master_TLS_Version:
1 row in set (0.00 sec)

ERROR:
No query specified

查看从库的gtid
mysql> show global variables like '%gtid%';
+----------------------------------+------------------------------------------------------------------------------------+
| Variable_name | Value |
+----------------------------------+------------------------------------------------------------------------------------+
| binlog_gtid_simple_recovery | ON |
| enforce_gtid_consistency | ON |
| gtid_executed | 26e410b4-22cb-11e9-be44-005056880888:1-2,
fc39b161-22ca-11e9-a638-005056ac6820:1-8 |
| gtid_executed_compression_period | 1000 |
| gtid_mode | ON |
| gtid_owned | |
| gtid_purged | 26e410b4-22cb-11e9-be44-005056880888:1-2 |
| session_track_gtids | OFF |
+----------------------------------+------------------------------------------------------------------------------------+
8 rows in set (0.01 sec)

接着查看从数据库的数据,发现kevin库已经同步过来了!
mysql> show databases;
+--------------------+
| Database |
+--------------------+
| information_schema |
| kevin |
| mysql |
| performance_schema |
| sys |
+--------------------+
5 rows in set (0.00 sec)

mysql> select * from kevin.haha;
+----+----------+
| id | name |
+----+----------+
| 1 | congcong |
| 2 | huihui |
| 3 | grace |
+----+----------+
3 rows in set (0.00 sec)

4)再回到主数据库mysql-master (172.16.60.211)上

查看master状态,发现已经有两个slave节点正常存在同步关系了
mysql> show slave hosts;
+-----------+------+------+-----------+--------------------------------------+
| Server_id | Host | Port | Master_id | Slave_UUID |
+-----------+------+------+-----------+--------------------------------------+
| 3 | | 3306 | 1 | 26e410b4-22cb-11e9-be44-005056880888 |
| 2 | | 3306 | 1 | 2afbc2f5-22cb-11e9-b9c0-00505688047c |
+-----------+------+------+-----------+--------------------------------------+
2 rows in set (0.00 sec)

5)测试数据同步
在主数据库mysql-master (172.16.60.211)上更新数据
mysql> insert into kevin.haha values(10,"heifei"),(11,"huoqiu"),(12,"chengxihu");
Query OK, 3 rows affected (0.05 sec)
Records: 3 Duplicates: 0 Warnings: 0

然后在两个slave从数据库上查看,发现已正常同步过来了
mysql> select * from kevin.haha;
+----+-----------+
| id | name |
+----+-----------+
| 1 | congcong |
| 2 | huihui |
| 3 | grace |
| 10 | heifei |
| 11 | huoqiu |
| 12 | chengxihu |
+----+-----------+
6 rows in set (0.00 sec)

安装配置ProxySQL

已经在上面第一步中介绍了安装方法,这里采用rpm包方式安装,安装过程省略……..
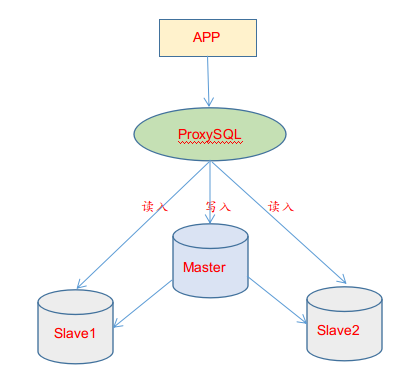
ProxySQL实现读写分离

向ProxySQL中添加MySQL节点

1
2
3
4
5
6
7
8
9
10
11
12
13
14
15
16
17
18
19
20
21
22
23
24
25
26
27
28
29
30
31
32
33
34
35
36
37
38
39
40
41
42
43
44
45
46
47
48
49
50
51
52
53
54
55
56
57
58
59
60
61
62
63
64
65
66
67
68
69
70
71
使用insert语句添加主机到mysql_servers表中,其中:hostgroup_id 为10表示写组,为20表示读组。

[root@mysql-proxy ~]# mysql -uadmin -padmin -P6032 -h127.0.0.1
............
MySQL [(none)]> insert into mysql_servers(hostgroup_id,hostname,port) values(10,'172.16.60.211',3306);
Query OK, 1 row affected (0.000 sec)

MySQL [(none)]> insert into mysql_servers(hostgroup_id,hostname,port) values(10,'172.16.60.212',3306);
Query OK, 1 row affected (0.000 sec)

MySQL [(none)]> insert into mysql_servers(hostgroup_id,hostname,port) values(10,'172.16.60.213',3306);
Query OK, 1 row affected (0.000 sec)

==========================================================================================================
如果在插入过程中,出现报错:
ERROR 1045 (#2800): UNIQUE constraint failed: mysql_servers.hostgroup_id, mysql_servers.hostname, mysql_servers.port

说明可能之前就已经定义了其他配置,可以清空这张表 或者 删除对应host的配置
MySQL [(none)]> select * from mysql_servers;
MySQL [(none)]> delete from mysql_servers;
Query OK, 6 rows affected (0.000 sec)
=========================================================================================================

查看这3个节点是否插入成功,以及它们的状态。
MySQL [(none)]> select * from mysql_servers\G;
*************************** 1. row ***************************
hostgroup_id: 10
hostname: 172.16.60.211
port: 3306
status: ONLINE
weight: 1
compression: 0
max_connections: 1000
max_replication_lag: 0
use_ssl: 0
max_latency_ms: 0
comment:
*************************** 2. row ***************************
hostgroup_id: 10
hostname: 172.16.60.212
port: 3306
status: ONLINE
weight: 1
compression: 0
max_connections: 1000
max_replication_lag: 0
use_ssl: 0
max_latency_ms: 0
comment:
*************************** 3. row ***************************
hostgroup_id: 10
hostname: 172.16.60.213
port: 3306
status: ONLINE
weight: 1
compression: 0
max_connections: 1000
max_replication_lag: 0
use_ssl: 0
max_latency_ms: 0
comment:
6 rows in set (0.000 sec)

ERROR: No query specified

如上修改后,加载到RUNTIME,并保存到disk
MySQL [(none)]> load mysql servers to runtime;
Query OK, 0 rows affected (0.006 sec)

MySQL [(none)]> save mysql servers to disk;
Query OK, 0 rows affected (0.348 sec)

监控后端MySQL节点
添加Mysql节点之后,还需要监控这些后端节点。对于后端是主从复制的环境来说,这是必须的,因为ProxySQL需要通过每个节点的read_only值来自动调整
它们是属于读组还是写组。

首先在后端master主数据节点上创建一个用于监控的用户名(只需在master上创建即可,因为会复制到slave上),这个用户名只需具有USAGE权限即可。如果还需
要监控复制结构中slave是否严重延迟于master(这个俗语叫做”拖后腿”,术语叫做”replication lag”),则还需具备replication client权限。

1
2
3
4
5
6
7
8
9
10
11
12
13
14
15
16
17
18
19
20
21
22
23
24
25
26
27
28
29
30
31
32
33
34
35
36
37
38
39
40
41
42
43
44
45
46
47
48
49
50
51
52
53
54
55
56
57
58
59
60
61
62
63
64
65
66
67
68
69
70
71
72
73
74
75
76
77
78
79
80
81
82
83
84
85
86
87
88
89
90
91
92
93
94
95
96
97
98
99
100
101
102
103
104
105
106
107
108
109
110
111
112
113
114
115
116
117
在mysql-master主数据库节点行执行:
[root@mysql-master ~]# mysql -p123456
..........

mysql> create user monitor@'172.16.60.%' identified by 'P@ssword1!';
Query OK, 0 rows affected (0.03 sec)

mysql> grant replication client on *.* to monitor@'172.16.60.%';
Query OK, 0 rows affected (0.02 sec)

mysql> flush privileges;
Query OK, 0 rows affected (0.02 sec)

然后回到mysql-proxy代理层节点上配置监控
[root@mysql-proxy ~]# mysql -uadmin -padmin -P6032 -h127.0.0.1
..........
MySQL [(none)]> set mysql-monitor_username='monitor';
Query OK, 1 row affected (0.000 sec)

MySQL [(none)]> set mysql-monitor_password='P@ssword1!';
Query OK, 1 row affected (0.000 sec)

修改后,加载到RUNTIME,并保存到disk
MySQL [(none)]> load mysql variables to runtime;
Query OK, 0 rows affected (0.001 sec)

MySQL [(none)]> save mysql variables to disk;
Query OK, 94 rows affected (0.079 sec)

验证监控结果:ProxySQL监控模块的指标都保存在monitor库的log表中。

以下是连接是否正常的监控(对connect指标的监控):
注意:可能会有很多connect_error,这是因为没有配置监控信息时的错误,配置后如果connect_error的结果为NULL则表示正常。
MySQL [(none)]> select * from mysql_server_connect_log;
+---------------+------+------------------+-------------------------+---------------+
| hostname | port | time_start_us | connect_success_time_us | connect_error |
+---------------+------+------------------+-------------------------+---------------+
| 172.16.60.211 | 3306 | 1548665195883957 | 762 | NULL |
| 172.16.60.212 | 3306 | 1548665195894099 | 399 | NULL |
| 172.16.60.213 | 3306 | 1548665195904266 | 483 | NULL |
| 172.16.60.211 | 3306 | 1548665255883715 | 824 | NULL |
| 172.16.60.212 | 3306 | 1548665255893942 | 656 | NULL |
| 172.16.60.211 | 3306 | 1548665495884125 | 615 | NULL |
| 172.16.60.212 | 3306 | 1548665495894254 | 441 | NULL |
| 172.16.60.213 | 3306 | 1548665495904479 | 638 | NULL |
| 172.16.60.211 | 3306 | 1548665512917846 | 487 | NULL |
| 172.16.60.212 | 3306 | 1548665512928071 | 994 | NULL |
| 172.16.60.213 | 3306 | 1548665512938268 | 613 | NULL |
+---------------+------+------------------+-------------------------+---------------+
20 rows in set (0.000 sec)

以下是对心跳信息的监控(对ping指标的监控)
MySQL [(none)]> select * from mysql_server_ping_log;
+---------------+------+------------------+----------------------+------------+
| hostname | port | time_start_us | ping_success_time_us | ping_error |
+---------------+------+------------------+----------------------+------------+
| 172.16.60.211 | 3306 | 1548665195883407 | 98 | NULL |
| 172.16.60.212 | 3306 | 1548665195885128 | 119 | NULL |
...........
| 172.16.60.213 | 3306 | 1548665415889362 | 106 | NULL |
| 172.16.60.213 | 3306 | 1548665562898295 | 97 | NULL |
+---------------+------+------------------+----------------------+------------+
110 rows in set (0.001 sec)

read_only日志此时也为空(正常来说,新环境配置时,这个只读日志是为空的)
MySQL [(none)]> select * from mysql_server_read_only_log;
Empty set (0.000 sec)

replication_lag的监控日志为空
MySQL [(none)]> select * from mysql_server_replication_lag_log;
Empty set (0.000 sec)

指定写组的id为10,读组的id为20。
MySQL [(none)]> insert into mysql_replication_hostgroups values(10,20,1);
Query OK, 1 row affected (0.000 sec)

在该配置加载到RUNTIME生效之前,先查看下各mysql server所在的组。
MySQL [(none)]> select hostgroup_id,hostname,port,status,weight from mysql_servers;
+--------------+---------------+------+--------+--------+
| hostgroup_id | hostname | port | status | weight |
+--------------+---------------+------+--------+--------+
| 10 | 172.16.60.211 | 3306 | ONLINE | 1 |
| 10 | 172.16.60.212 | 3306 | ONLINE | 1 |
| 10 | 172.16.60.213 | 3306 | ONLINE | 1 |
+--------------+---------------+------+--------+--------+
3 rows in set (0.000 sec)

3个节点都在hostgroup_id=10的组中。
现在,将刚才mysql_replication_hostgroups表的修改加载到RUNTIME生效。
MySQL [(none)]> load mysql servers to runtime;
Query OK, 0 rows affected (0.003 sec)

MySQL [(none)]> save mysql servers to disk;
Query OK, 0 rows affected (0.361 sec)

一加载,Monitor模块就会开始监控后端的read_only值,当监控到read_only值后,就会按照read_only的值将某些节点自动移动到读/写组。
例如,此处所有节点都在id=10的写组,slave1和slave2都是slave,它们的read_only=1,这两个节点将会移动到id=20的组。
如果一开始这3节点都在id=20的读组,那么移动的将是Master节点,会移动到id=10的写组。

现在看结果
MySQL [(none)]> select hostgroup_id,hostname,port,status,weight from mysql_servers;
+--------------+---------------+------+--------+--------+
| hostgroup_id | hostname | port | status | weight |
+--------------+---------------+------+--------+--------+
| 10 | 172.16.60.211 | 3306 | ONLINE | 1 |
| 20 | 172.16.60.212 | 3306 | ONLINE | 1 |
| 20 | 172.16.60.213 | 3306 | ONLINE | 1 |
+--------------+---------------+------+--------+--------+
3 rows in set (0.000 sec)

MySQL [(none)]> select * from mysql_server_read_only_log;
+---------------+------+------------------+-----------------+-----------+-------+
| hostname | port | time_start_us | success_time_us | read_only | error |
+---------------+------+------------------+-----------------+-----------+-------+
| 172.16.60.212 | 3306 | 1548665728919212 | 1684 | 1 | NULL |
| 172.16.60.211 | 3306 | 1548665728918753 | 3538 | 0 | NULL |
| 172.16.60.213 | 3306 | 1548665728919782 | 3071 | 1 | NULL |

配置mysql_users
上面的所有配置都是关于后端MySQL节点的,现在可以配置关于SQL语句的,包括:发送SQL语句的用户、SQL语句的路由规则、SQL查询的缓存、SQL语句的重写等等。本小节是SQL请求所使用的用户配置,例如root用户。这要求我们需要先在后端MySQL节点添加好相关用户。这里以root和sqlsender两个用户名为例.

1
2
3
4
5
6
7
8
9
10
11
12
13
14
15
16
17
18
19
20
21
22
23
24
25
26
27
28
29
30
31
32
33
34
35
36
37
38
39
40
41
42
43
44
45
46
47
48
49
50
51
52
53
54
55
56
57
58
59
60
61
62
63
64
65
66
67
68
69
70
71
72
73
74
75
76
77
78
79
80
81
82
83
84
85
86
87
88
89
90
91
92
93
94
95
96
97
98
99
100
101
102
103
104
105
106
107
108
109
110
111
112
113
114
115
116
117
118
119
120
121
122
123
124
125
126
127
128
129
首先,在mysql-master主数据库节点上执行:(只需master执行即可,会复制给两个slave)
[root@mysql-master ~]# mysql -p123456
.........
mysql> grant all on *.* to root@'172.16.60.%' identified by 'passwd';
Query OK, 0 rows affected, 1 warning (0.04 sec)

mysql> grant all on *.* to sqlsender@'172.16.60.%' identified by 'P@ssword1!';
Query OK, 0 rows affected, 1 warning (0.03 sec)

mysql> flush privileges;
Query OK, 0 rows affected (0.03 sec)

然后回到mysql-proxy代理层节点,配置mysql_users表,将刚才的两个用户添加到该表中。
admin> insert into mysql_users(username,password,default_hostgroup) values('root','passwd',10);
Query OK, 1 row affected (0.001 sec)

admin> insert into mysql_users(username,password,default_hostgroup) values('sqlsender','P@ssword1!',10);
Query OK, 1 row affected (0.000 sec)

admin> load mysql users to runtime;
Query OK, 0 rows affected (0.001 sec)

admin> save mysql users to disk;
Query OK, 0 rows affected (0.108 sec)

mysql_users表有不少字段,最主要的三个字段为username、password和default_hostgroup:
- username:前端连接ProxySQL,以及ProxySQL将SQL语句路由给MySQL所使用的用户名。
- password:用户名对应的密码。可以是明文密码,也可以是hash密码。如果想使用hash密码,可以先在某个MySQL节点上执行
select password(PASSWORD),然后将加密结果复制到该字段。
- default_hostgroup:该用户名默认的路由目标。例如,指定root用户的该字段值为10时,则使用root用户发送的SQL语句默认
情况下将路由到hostgroup_id=10组中的某个节点。

admin> select * from mysql_users\G
*************************** 1. row ***************************
username: root
password: passwd
active: 1
use_ssl: 0
default_hostgroup: 10
default_schema: NULL
schema_locked: 0
transaction_persistent: 1
fast_forward: 0
backend: 1
frontend: 1
max_connections: 10000
*************************** 2. row ***************************
username: sqlsender
password: P@ssword1!
active: 1
use_ssl: 0
default_hostgroup: 10
default_schema: NULL
schema_locked: 0
transaction_persistent: 1
fast_forward: 0
backend: 1
frontend: 1
max_connections: 10000
2 rows in set (0.000 sec)

虽然这里没有详细介绍mysql_users表,但上面标注了"注意本行"的两个字段必须要引起注意。只有active=1的用户才是有效的用户。
至于transaction_persistent字段,当它的值为1时,表示事务持久化:当某连接使用该用户开启了一个事务后,那么在事务提交/回滚之前,
所有的语句都路由到同一个组中,避免语句分散到不同组。在以前的版本中,默认值为0,不知道从哪个版本开始,它的默认值为1。
我们期望的值为1,所以在继续下面的步骤之前,先查看下这个值,如果为0,则执行下面的语句修改为1。

MySQL [(none)]> update mysql_users set transaction_persistent=1 where username='root';
Query OK, 1 row affected (0.000 sec)

MySQL [(none)]> update mysql_users set transaction_persistent=1 where username='sqlsender';
Query OK, 1 row affected (0.000 sec)

MySQL [(none)]> load mysql users to runtime;
Query OK, 0 rows affected (0.001 sec)

MySQL [(none)]> save mysql users to disk;
Query OK, 0 rows affected (0.123 sec)

然后,分别使用root用户和sqlsender用户测试下它们是否能路由到默认的hostgroup_id=10(它是一个写组)读、写数据。
下面是通过转发端口6033连接的,连接的是转发到后端真正的数据库!
[root@mysql-proxy ~]# mysql -uroot -ppasswd -P6033 -h127.0.0.1 -e "select @@server_id"
+-------------+
| @@server_id |
+-------------+
| 1 |
+-------------+
[root@mysql-proxy ~]# mysql -uroot -ppasswd -P6033 -h127.0.0.1 -e "create database proxy_test"
[root@mysql-proxy ~]# mysql -uroot -ppasswd -P6033 -h127.0.0.1 -e "show databases;"
+--------------------+
| Database |
+--------------------+
| information_schema |
| kevin |
| mysql |
| performance_schema |
| proxy_test |
| sys |
+--------------------+
[root@mysql-proxy ~]# mysql -usqlsender -pP@ssword1! -P6033 -h127.0.0.1 -e 'use proxy_test;create table t(id int);'
[root@mysql-proxy ~]# mysql -usqlsender -pP@ssword1! -P6033 -h127.0.0.1 -e 'show tables from proxy_test;'
+----------------------+
| Tables_in_proxy_test |
+----------------------+
| t |
+----------------------+
[root@mysql-proxy ~]# mysql -usqlsender -pP@ssword1! -P6033 -h127.0.0.1 -e 'show databases;'
+--------------------+
| Database |
+--------------------+
| information_schema |
| kevin |
| mysql |
| performance_schema |
| proxy_test |
| sys |
+--------------------+

然后再删除上面这个测试库
[root@mysql-proxy ~]# mysql -usqlsender -pP@ssword1! -P6033 -h127.0.0.1 -e 'drop database proxy_test;'
[root@mysql-proxy ~]# mysql -usqlsender -pP@ssword1! -P6033 -h127.0.0.1 -e 'show databases;'
+--------------------+
| Database |
+--------------------+
| information_schema |
| kevin |
| mysql |
| performance_schema |
| sys |
+--------------------+

读写分离:配置路由规则
ProxySQL的路由规则非常灵活,可以基于用户、基于schema以及基于每个语句实现路由规则的定制。本案例作为一个入门配置,实现一个最简单的语句级路由规则,从而实现读写分离。

必须注意: 这只是实验,实际的路由规则绝不应该仅根据所谓的读、写操作进行分离,而是从各项指标中找出压力大、执行频繁的语句单独写规则、做缓存等等。和查询规则有关的表有两个:mysql_query_rules和mysql_query_rules_fast_routing,后者是前者的扩展表,1.4.7之后才支持该快速路由表。本案例只介绍第一个表。插入两个规则,目的是将select语句分离到hostgroup_id=20的读组,但由于select语句中有一个特殊语句SELECT…FOR UPDATE它会申请写锁,所以应该路由到hostgroup_id=10的写组.

1
2
3
4
5
6
7
8
9
10
11
12
13
14
15
16
17
18
19
20
21
22
23
24
25
26
27
28
29
30
31
32
33
34
35
36
37
38
39
40
41
42
43
44
45
46
47
48
49
50
51
52
53
54
55
56
57
58
59
60
61
62
63
64
65
66
67
68
69
70
71
72
73
74
75
76
77
78
79
[root@mysql-proxy ~]# mysql -uadmin -padmin -P6032 -h127.0.0.1                       
............
MySQL [(none)]> insert into mysql_query_rules(rule_id,active,match_digest,destination_hostgroup,apply) VALUES (1,1,'^SELECT.*FOR UPDATE$',10,1), (2,1,'^SELECT',20,1);
Query OK, 2 rows affected (0.000 sec)

MySQL [(none)]> load mysql query rules to runtime;
Query OK, 0 rows affected (0.000 sec)

MySQL [(none)]> save mysql query rules to disk;
Query OK, 0 rows affected (0.272 sec)

需要注意: select ... for update规则的rule_id必须要小于普通的select规则的rule_id,因为ProxySQL是根据rule_id的顺序进行规则匹配的。

再来测试下,读操作是否路由给了hostgroup_id=20的读组, 如下发现server_id为2和3的节点 (即slave从节点)在读组内
[root@mysql-proxy ~]# mysql -uroot -ppasswd -P6033 -h127.0.0.1 -e 'select @@server_id'
+-------------+
| @@server_id |
+-------------+
| 3 |
+-------------+
[root@mysql-proxy ~]# mysql -uroot -ppasswd -P6033 -h127.0.0.1 -e 'select @@server_id'
+-------------+
| @@server_id |
+-------------+
| 3 |
+-------------+
[root@mysql-proxy ~]# mysql -uroot -ppasswd -P6033 -h127.0.0.1 -e 'select @@server_id'
+-------------+
| @@server_id |
+-------------+
| 2 |
+-------------+

读操作已经路由给读组,再看看写操作。这里以事务持久化进行测试。
[root@mysql-proxy ~]# mysql -uroot -ppasswd -P6033 -h127.0.0.1 -e 'start transaction;select @@server_id;commit;select @@server_id;'
+-------------+
| @@server_id |
+-------------+
| 1 |
+-------------+
+-------------+
| @@server_id |
+-------------+
| 3 |
+-------------+
[root@mysql-proxy ~]# mysql -uroot -ppasswd -P6033 -h127.0.0.1 -e 'start transaction;select @@server_id;commit;select @@server_id;'
+-------------+
| @@server_id |
+-------------+
| 1 |
+-------------+
+-------------+
| @@server_id |
+-------------+
| 2 |

显然,一切都按照预期进行。最后,如果想查看路由的信息,可查询stats库中的stats_mysql_query_digest表。
以下是该表的一个输出格式示例(和本案例无关)。
[root@mysql-proxy ~]# mysql -uadmin -padmin -P6032 -h127.0.0.1
............
MySQL [(none)]> SELECT hostgroup hg, sum_time, count_star, digest_text FROM stats_mysql_query_digest ORDER BY sum_time DESC;
+----+----------+------------+----------------------------------+
| hg | sum_time | count_star | digest_text |
+----+----------+------------+----------------------------------+
| 10 | 283841 | 1 | drop database proxy_test |
| 10 | 161020 | 1 | create table t(id int) |
| 10 | 36002 | 1 | create database proxy_test |
| 20 | 2719 | 5 | select @@server_id |
| 10 | 1250 | 3 | select @@server_id |
| 10 | 1102 | 2 | show databases |
| 10 | 789 | 2 | start transaction |
| 10 | 655 | 1 | SELECT DATABASE() |
| 10 | 629 | 1 | show databases |
| 10 | 564 | 1 | show tables from proxy_test |
| 10 | 286 | 2 | commit |
| 10 | 0 | 8 | select @@version_comment limit ? |
| 10 | 0 | 5 | select @@version_comment limit ? |
+----+----------+------------+----------------------------------+
13 rows in set (0.002 sec)

测试读写分离效果

1
2
3
4
5
6
7
8
9
10
11
12
13
14
15
16
17
18
19
20
21
22
23
24
25
26
27
28
29
30
31
32
33
34
35
36
37
38
39
40
41
42
43
44
45
46
47
48
49
50
51
52
53
54
55
56
57
58
59
60
61
62
63
64
65
66
67
68
69
70
71
72
73
74
75
76
77
由于读写操作都记录在proxysql的stats_mysql_query_digest表内。
为了测试读写分离的效果,可以先清空此表中之前的记录 (即之前在实现读写分配路由配置之前的记录)

下面这个命令是专门清空stats_mysql_query_digest表的 (使用"delete from stats_mysql_query_digest" 清空不掉!)
MySQL [(none)]> SELECT 1 FROM stats_mysql_query_digest_reset LIMIT 1;
+---+
| 1 |
+---+
| 1 |
+---+
1 row in set (0.002 sec)

MySQL [(none)]> select hostgroup,username,digest_text,count_star from stats_mysql_query_digest;
Empty set (0.001 sec)

在mysql-proxy代理层节点,通过proxysql进行数据写入,并查看
[root@mysql-proxy ~]# mysql -uroot -ppasswd -P6033 -h127.0.0.1 -e 'select * from kevin.haha;'
+----+-----------+
| id | name |
+----+-----------+
| 1 | congcong |
| 2 | huihui |
| 3 | grace |
| 11 | huoqiu |
| 12 | chengxihu |
| 21 | zhongguo |
+----+-----------+
[root@mysql-proxy ~]# mysql -uroot -ppasswd -P6033 -h127.0.0.1 -e 'delete from kevin.haha where id > 3;'
[root@mysql-proxy ~]# mysql -uroot -ppasswd -P6033 -h127.0.0.1 -e 'insert into kevin.haha values(21,"zhongguo"),(22,"xianggang"),(23,"taiwan");'
[root@mysql-proxy ~]# mysql -uroot -ppasswd -P6033 -h127.0.0.1 -e 'update kevin.haha set name="hangzhou" where id=22 ;'
[root@mysql-proxy ~]# mysql -uroot -ppasswd -P6033 -h127.0.0.1 -e 'select * from kevin.haha;'
+----+----------+
| id | name |
+----+----------+
| 1 | congcong |
| 2 | huihui |
| 3 | grace |
| 21 | zhongguo |
| 22 | hangzhou |
| 23 | taiwan |
+----+----------+

在mysql-master主数据库和mysql-slave1、mysql-slave2从数据上查看
[root@mysql-master ~]# mysql -p123456
.........
mysql> select * from kevin.haha;
+----+----------+
| id | name |
+----+----------+
| 1 | congcong |
| 2 | huihui |
| 3 | grace |
| 21 | zhongguo |
| 22 | hangzhou |
| 23 | taiwan |
+----+----------+
6 rows in set (0.00 sec)

发现在客户端通过proxysql插件更新的数据,已经写到mysql-master主数据库上,并同步到mysql-slave1和mysql-slave2两个从数据库上了!

最后在proxysql管理端查看读写分离
[root@mysql-proxy ~]# mysql -uadmin -padmin -h127.0.0.1 -P6032
............
............
MySQL [(none)]> select hostgroup,username,digest_text,count_star from stats_mysql_query_digest;
+-----------+----------+------------------------------------------------+------------+
| hostgroup | username | digest_text | count_star |
+-----------+----------+------------------------------------------------+------------+
| 10 | root | insert into kevin.haha values(?,?),(?,?),(?,?) | 1 |
| 10 | root | delete from kevin.haha where id > ? | 1 |
| 10 | root | update kevin.haha set name=? where id=? | 1 |
| 20 | root | select * from kevin.haha | 2 |
| 10 | root | select @@version_comment limit ? | 5 |
+-----------+----------+------------------------------------------------+------------+
5 rows in set (0.001 sec)

从上述结果就可以看出proxysql实现的读写分离配置是成功的,读请求是转发到group20的读组内,写请求转发到group10的写组内!!

负载均衡测试 (加权轮询)

如上已经配置好一主(mysql-master,在hostgroup10写组内)、两从(mysql-slave1和mysql-slave2,在hostgroup20读组内) ,并且已经在”mysql_query_rules”表中配置了路由规则,即写操作转发到hostgroup10组,读操作转发到hostgroup20组.

1
2
3
4
5
6
7
8
9
10
11
12
13
14
15
16
17
18
19
20
21
22
23
24
25
26
27
28
29
30
31
32
33
34
35
36
37
38
39
40
41
42
43
44
45
46
47
48
49
50
51
52
53
54
55
56
57
58
59
60
61
62
63
64
65
66
67
68
69
70
71
72
73
74
75
76
77
78
79
80
81
82
83
84
85
86
87
88
89
90
91
92
93
94
95
96
97
98
99
100
101
102
103
104
105
106
107
108
109
110
111
112
113
114
115
116
117
118
119
120
121
122
123
124
125
126
127
128
129
130
131
132
133
134
135
136
137
138
139
140
141
142
143
144
145
146
147
148
149
150
151
152
153
154
155
156
157
158
159
160
161
162
163
164
165
166
167
MySQL [(none)]> select * from mysql_query_rules;           
+---------+--------+----------+------------+--------+-------------+------------+------------+--------+----------------------+---------------+----------------------+--------------+---------+-----------------+-----------------------+-----------+-----------+---------+---------+-------+-------------------+----------------+------------------+-----------+--------+-------------+-----------+-----+-------+---------+
| rule_id | active | username | schemaname | flagIN | client_addr | proxy_addr | proxy_port | digest | match_digest | match_pattern | negate_match_pattern | re_modifiers | flagOUT | replace_pattern | destination_hostgroup | cache_ttl | reconnect | timeout | retries | delay | next_query_flagIN | mirror_flagOUT | mirror_hostgroup | error_msg | OK_msg | sticky_conn | multiplex | log | apply | comment |
+---------+--------+----------+------------+--------+-------------+------------+------------+--------+----------------------+---------------+----------------------+--------------+---------+-----------------+-----------------------+-----------+-----------+---------+---------+-------+-------------------+----------------+------------------+-----------+--------+-------------+-----------+-----+-------+---------+
| 1 | 1 | NULL | NULL | 0 | NULL | NULL | NULL | NULL | ^SELECT.*FOR UPDATE$ | NULL | 0 | CASELESS | NULL | NULL | 10 | NULL | NULL | NULL | NULL | NULL | NULL | NULL | NULL | NULL | NULL | NULL | NULL | NULL | 1 | NULL |
| 2 | 1 | NULL | NULL | 0 | NULL | NULL | NULL | NULL | ^SELECT | NULL | 0 | CASELESS | NULL | NULL | 20 | NULL | NULL | NULL | NULL | NULL | NULL | NULL | NULL | NULL | NULL | NULL | NULL | NULL | 1 | NULL |
+---------+--------+----------+------------+--------+-------------+------------+------------+--------+----------------------+---------------+----------------------+--------------+---------+-----------------+-----------------------+-----------+-----------+---------+---------+-------+-------------------+----------------+------------------+-----------+--------+-------------+-----------+-----+-------+---------+
2 rows in set (0.000 sec)

由于hostgroup10写组内只要一个节点(mysql-master节点),hostgroup20读组内有两个节点(mysql-slave1、mysql-slave2)
所以这里只能测试读节点的负载均衡

[root@mysql-proxy ~]# mysql -uroot -ppasswd -P6033 -h127.0.0.1 -e "select @@hostname"
+--------------+
| @@hostname |
+--------------+
| mysql-slave1 |
+--------------+
[root@mysql-proxy ~]# mysql -uroot -ppasswd -P6033 -h127.0.0.1 -e "select @@hostname"
+--------------+
| @@hostname |
+--------------+
| mysql-slave1 |
+--------------+
[root@mysql-proxy ~]# mysql -uroot -ppasswd -P6033 -h127.0.0.1 -e "select @@hostname"
+--------------+
| @@hostname |
+--------------+
| mysql-slave1 |
+--------------+
[root@mysql-proxy ~]# mysql -uroot -ppasswd -P6033 -h127.0.0.1 -e "select @@hostname"
+--------------+
| @@hostname |
+--------------+
| mysql-slave2 |
+--------------+
[root@mysql-proxy ~]# mysql -uroot -ppasswd -P6033 -h127.0.0.1 -e "select @@hostname"
+--------------+
| @@hostname |
+--------------+
| mysql-slave2 |
+--------------+
[root@mysql-proxy ~]# mysql -uroot -ppasswd -P6033 -h127.0.0.1 -e "select @@hostname"
+--------------+
| @@hostname |
+--------------+
| mysql-slave2 |
+--------------+

再实验下mysql -e跟多条语句,看看如何
[root@mysql-proxy ~]# mysql -uroot -ppasswd -P6033 -h127.0.0.1 -e "select @@hostname;select @@hostname;select @@hostname"
+--------------+
| @@hostname |
+--------------+
| mysql-slave1 |
+--------------+
+--------------+
| @@hostname |
+--------------+
| mysql-slave1 |
+--------------+
+--------------+
| @@hostname |
+--------------+
| mysql-slave1 |
+--------------+
[root@mysql-proxy ~]# mysql -uroot -ppasswd -P6033 -h127.0.0.1 -e "select @@hostname;select @@hostname;select @@hostname"
+--------------+
| @@hostname |
+--------------+
| mysql-slave2 |
+--------------+
+--------------+
| @@hostname |
+--------------+
| mysql-slave2 |
+--------------+
+--------------+
| @@hostname |
+--------------+
| mysql-slave2 |
+--------------+
[root@mysql-proxy ~]# mysql -uroot -ppasswd -P6033 -h127.0.0.1 -e "select @@hostname;select @@hostname;select @@hostname"
+--------------+
| @@hostname |
+--------------+
| mysql-slave1 |
+--------------+
+--------------+
| @@hostname |
+--------------+
| mysql-slave1 |
+--------------+
+--------------+
| @@hostname |
+--------------+
| mysql-slave1 |
+--------------+
[root@mysql-proxy ~]# mysql -uroot -ppasswd -P6033 -h127.0.0.1 -e "select @@hostname;select @@hostname;select @@hostname"
+--------------+
| @@hostname |
+--------------+
| mysql-slave2 |
+--------------+
+--------------+
| @@hostname |
+--------------+
| mysql-slave2 |
+--------------+
+--------------+
| @@hostname |
+--------------+
| mysql-slave2 |
+--------------+

由以上结果可能会猜想并可印证:
在一个client的一个链接周期内,所有query路由到同一台后端!
即在同一个client的链接周期内,query路由不会转发到同组内的不同后端节点机上,只能转发到同一台后端节点机上!

但是这只是个假象!!! 是因为正好用到了select @ 语句。
如官网所介绍: sends a query that implicitly disables multiplexing. For example, if you run “SELECT @a” , ProxySQL will disable
multiplexing for that client and will always use the same backend connection

最后可以知道: proxysql的负载方式目前仅为加权轮询一种(经验证所确认),并无其他机制!

===============================================================================
可以编写一个负载均衡的shell测试脚本:
[root@mysql-proxy ~]# which mysql
/usr/bin/mysql
[root@mysql-proxy ~]# vim /opt/test_proxysql_lb.sh
#!/bin/bash

i=0
while(($i<200))
do
/usr/bin/mysql -uroot -ppasswd -P6033 -h127.0.0.1 -e "select @@hostname;" >> /tmp/test_proxy_sql_lb.txt
let "i++"
echo "$i"
sleep 0.1
done

执行测试脚本:
[root@mysql-proxy ~]# sh -x /opt/test_proxysql_lb.sh > /dev/null 2>&1

执行后检查结果
[root@mysql-proxy ~]# grep "mysql-slave1" /tmp/test_proxy_sql_lb.txt|wc -l
86
[root@mysql-proxy ~]# grep "mysql-slave2" /tmp/test_proxy_sql_lb.txt|wc -l
114

以上查询结果符合预期

开启ProxySQL的Web统计功能

1
2
3
4
5
6
7
8
9
10
11
12
13
14
15
16
17
18
19
20
21
22
23
24
25
26
27
28
首先打开web功能
[root@mysql-proxy ~]# mysql -uadmin -padmin -h127.0.0.1 -P6032
............
............
MySQL [(none)]> update global_variables set variable_value='true' where variable_name='admin-web_enabled';
Query OK, 1 row affected (0.001 sec)

MySQL [(none)]> LOAD ADMIN VARIABLES TO RUNTIME;
Query OK, 0 rows affected (0.001 sec)

MySQL [(none)]> SAVE ADMIN VARIABLES TO DISK;
Query OK, 31 rows affected (0.070 sec)

然后查看端口和登录web界面的用户名和密码,用户名和密码与stat账户一致:
MySQL [(none)]> select * from global_variables where variable_name LIKE 'admin-web%' or variable_name LIKE 'admin-stats%';
+-----------------------------------+----------------+
| variable_name | variable_value |
+-----------------------------------+----------------+
| admin-stats_credentials | stats:stats | #账户密码
| admin-stats_mysql_connections | 60 |
| admin-stats_mysql_connection_pool | 60 |
| admin-stats_mysql_query_cache | 60 |
| admin-stats_system_cpu | 60 |
| admin-stats_system_memory | 60 |
| admin-web_enabled | true |
| admin-web_port | 6080 | #端口
+-----------------------------------+----------------+
8 rows in set (0.003 sec)

查看web端口是否正常打开

1
2
3
[root@mysql-proxy ~]# lsof -i:6080
COMMAND PID USER FD TYPE DEVICE SIZE/OFF NODE NAME
proxysql 22324 root 27u IPv4 23010645 0t0 TCP *:6080 (LISTEN)

访问http://172.16.60.214:6080并使用stats:stats登录即可查看一些统计信息。

scheduler打印proxysql状态到日志

1
2
3
4
5
6
7
8
9
10
11
12
13
14
15
16
17
18
19
20
21
22
23
24
25
26
27
[root@mysql-proxy ~]# mkdir -p /opt/proxysql/log
[root@mysql-proxy ~]# vim /opt/proxysql/log/status.sh
#!/bin/bash
DATE=`date "+%Y-%m-%d %H:%M:%S"`
echo "{\"dateTime\":\"$DATE\",\"status\":\"running\"}" >> /opt/proxysql/log/status_log

[root@mysql-proxy ~]# chmod 777 /opt/proxysql/log/status.sh

然后在proxysql插入一条scheduler (定义每分钟打印一次,即60000毫秒)
[root@mysql-proxy ~]# mysql -uadmin -padmin -h127.0.0.1 -P6032
............
............
MySQL [(none)]> insert into scheduler(active,interval_ms,filename) values (1,60000,'/opt/proxysql/log/status.sh');
Query OK, 1 row affected (0.000 sec)

MySQL [(none)]> LOAD SCHEDULER TO RUNTIME;
Query OK, 0 rows affected (0.001 sec)

MySQL [(none)]> SAVE SCHEDULER TO DISK;
Query OK, 0 rows affected (0.105 sec)

然后查看日志就可以看到proxysql 的运行结果了:
[root@mysql-proxy ~]# tail -f /opt/proxysql/log/status_log
{"dateTime":"2019-02-19 14:24:03","status":"running"}
{"dateTime":"2019-02-19 14:25:03","status":"running"}
{"dateTime":"2019-02-19 14:26:03","status":"running"}
{"dateTime":"2019-02-19 14:27:03","status":"running"}
-------------本文结束感谢您的阅读-------------

本文标题:生产mysql数据库集群优化<二>--proxysql安装及优化

文章作者:豌豆多多

发布时间:2021年06月23日 - 14:06

最后更新:2021年06月23日 - 14:06

原始链接:https://wandouduoduo.github.io/articles/8307f670.html

许可协议: 署名-非商业性使用-禁止演绎 4.0 国际 转载请保留原文链接及作者。

原创技术分享,您的支持将鼓励我继续创作