有很多next主题的网站都配置了很多特效,网站看起来很是炫酷。人都是视觉动物,让你的网站或博客酷炫、与众不同,是提高网站逼格和吸引人气的必备技能。那么这些特效都是是怎么配置的呢?接下来我会讲一讲如何配置next6.x或7.x最新版本实现一些炫酷的效果。先看下我博客网站的效果吧:wandouduoduo.github.io
参考
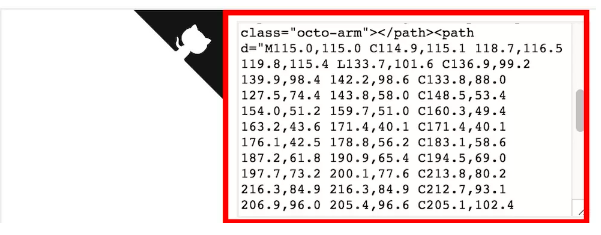
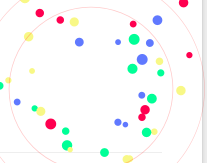
在右上角或者左上角实现fork me on github
效果图如下图所示:

具体实现方法
在GitHub Ribbons或GitHub Corners选择一款你喜欢的挂饰,拷贝方框内的代码
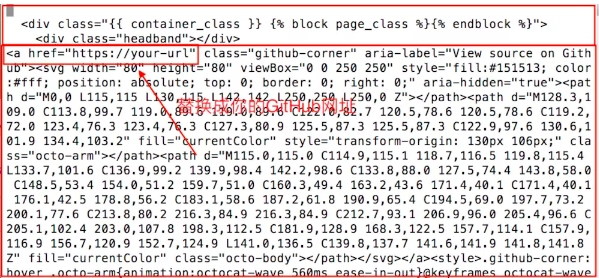
将刚刚复制的挂饰代码,添加到Blog/themes/next/layout/_layout.swig文件中,添加位置如下图所示(放在<div class="headband"></div>下方):
添加RSS
实现效果图

具体实现方法
切换到Blog文件夹(hexo init的文件夹)下,并安装插件
1 | cd [Blog] |
安装成功之后,编辑Blog/_config.yml文件,在文件末尾添加
1 | # Extensions |
配置主题_config.yml文件,command+f搜索rss,在后面加上/atom.xml
1 | # Set rss to false to disable feed link. |
添加动态背景
实现效果图
具体实现方法
主题配置文件中找到canvas_nest,设置成ture就OK啦。
1 | # Canvas-nest |
修改文章内链接文本样式
实现效果图
具体实现方法
修改文件 themes\next\source\css\_common\components\post\post.styl,在末尾添加如下css样式,:
1 | // 文章内链接文本样式 |
其中选择.post-body 是为了不影响标题,选择 p 是为了不影响首页“阅读全文”的显示样式,颜色可以自己定义。
修改底部标签样式
实现效果图

具体实现方法
修改Blog\themes\next\layout\_macro\post.swig中文件,command+f搜索rel="tag">#,将#替换成<i class="fa fa-tag"></i>。输入以下命令,查看效果:
1 | hexo clean |
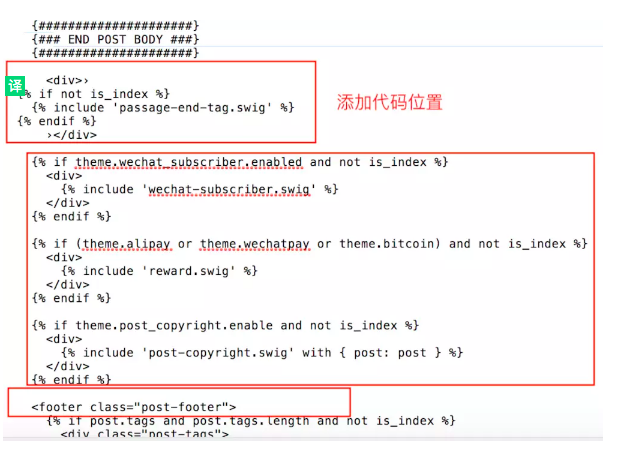
在文章末尾添加“文章结束”标记
实现效果图

具体实现方法
在路径Blog\themes\next\layout\_macro文件夹中新建passage-end-tag.swig文件,并填写内容如下:
1 | <div> |
打开Blog\themes\next\layout\_macro\post.swig,在post-body之后,post-footer之前(post-footer之前两个DIV),添加以下代码:
1 | <div> |
添加位置,如下图所示:
然后打开主题配置文件_config.yml,在末尾添加:
1 | # 文章末尾添加“本文结束”标记 |
修改作者头像并旋转:
实现效果图:

具体实现方法
在Blog/_config.yml中添加头像链接地址
1 | //添加头像地址 |
打开\themes\next\source\css\_common\components\sidebar\sidebar-author.styl,在里面添加如下代码:
1 | .site-author-image { |
修改``代码块自定义样式
具体实现方法
打开Blog\themes\next\source\css\_custom\custom.styl,添加以下代码:
1 | // Custom styles. |
侧边栏社交小图标设置
实现效果图
图标可以去Font Awesome Icon网站去找,找到后复制名字到相应的位置即可。
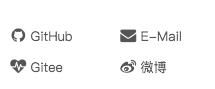
具体实现方法
打开主题配置文件_config.yml,command+f搜索Social,将你有的社交账号前面的#号去掉。
1 | #social: |
主页文章添加阴影效果
实现效果图
具体实现方法
打开\themes\next\source\css\_custom\custom.styl,向里面加入:
1 | // 主页文章添加阴影效果 |
在网站底部加上访问量
实现效果图

具体实现方法
6.x后集成了busuanzi模块统计,只需要打开\themes\next\_config文件编辑如下即可
1 | busuanzi_count: |
网站底部字数统计
具体方法实现
切换到根目录下,然后运行如下代码
1 | $ npm install hexo-wordcount --save |
然后在/themes/next/layout/_partials/footer.swig文件尾部添加加上:
1 | <div class="theme-info"> |
设置网站的图标Favicon
实现效果图

具体方法实现
在图标网站找一张你喜欢的图标(大:32x32 小:16x16),图标网站:easyicon或者阿里巴巴矢量图标库。将下载下来的小图和中图放在Blog/themes/next/source/images,将默认的两张图片替换掉。修改主题配置文件,如果你自定义了图片名字,需要做修改:
1 | favicon: |
实现文章统计功能
具体实现方法
在根目录下安装 hexo-wordcount,运行:
1 | $ npm install hexo-wordcount --save |
然后在主题的配置文件中,配置如下:
1 | symbols_count_time: |
添加顶部加载条
具体实现方法
编辑主题配置文件,command+F搜索pace,将其值改为ture就可以了,选择一款你喜欢的样式。
1 | # Progress bar in the top during page loading. |
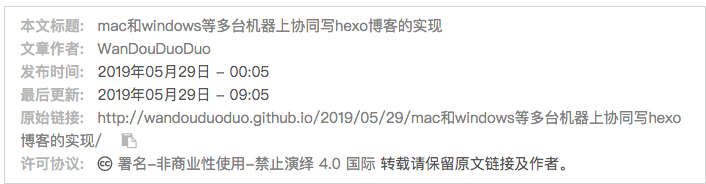
在文章底部增加版权信息
实现效果图
在目录Blog/themes/next/layout/_macro/,添加文件 my-copyright.swig,内容如下:
1 | {% if page.copyright %} |
在目录Blog/themes/next/source/css/_common/components/post/下添加文件my-post-copyright.styl,添加以下代码:
1 | .my_post_copyright { |
修改next/layout/_macro/post.swig,在代码
1 | <div> |
之前添加增加如下代码:
1 | <div> |
修改next/source/css/_common/components/post/post.styl文件,在最后一行增加代码:
1 | @import "my-post-copyright" |
保存重新生成即可。
如果要在该博文下面增加版权信息的显示,需要在 Markdown 中增加copyright: true的设置,类似:
1 | --- |
配置根目录下的_config.yml文件,配置为:
1 | # URL |
隐藏网页底部powered By Hexo / 强力驱动
打开Blog/themes/next/layout/_partials/footer.swig,注释掉相应代码。
1 | //用下面的符号注释,注释代码用下面括号括起来 |
修改字体大小
打开\themes\next\source\css\ _variables\base.styl文件,将$font-size-base改成16px,如下所示:
1 | $font-size-base =16px |
添加打赏
打开themes/next/_config.yml中配置如下
1 | reward: |
修改文件next/source/css/_common/components/post/post-reward.styl,然后注释如下即可
1 | /* |
点击爆炸效果
效果图
实现方法
themes/next/source/js/src里面建一个叫fireworks.js的文件,代码如下:
1 | "use strict";function updateCoords(e){pointerX=(e.clientX||e.touches[0].clientX)-canvasEl.getBoundingClientRect().left,pointerY=e.clientY||e.touches[0].clientY-canvasEl.getBoundingClientRect().top}function setParticuleDirection(e){var t=anime.random(0,360)*Math.PI/180,a=anime.random(50,180),n=[-1,1][anime.random(0,1)]*a;return{x:e.x+n*Math.cos(t),y:e.y+n*Math.sin(t)}}function createParticule(e,t){var a={};return a.x=e,a.y=t,a.color=colors[anime.random(0,colors.length-1)],a.radius=anime.random(16,32),a.endPos=setParticuleDirection(a),a.draw=function(){ctx.beginPath(),ctx.arc(a.x,a.y,a.radius,0,2*Math.PI,!0),ctx.fillStyle=a.color,ctx.fill()},a}function createCircle(e,t){var a={};return a.x=e,a.y=t,a.color="#F00",a.radius=0.1,a.alpha=0.5,a.lineWidth=6,a.draw=function(){ctx.globalAlpha=a.alpha,ctx.beginPath(),ctx.arc(a.x,a.y,a.radius,0,2*Math.PI,!0),ctx.lineWidth=a.lineWidth,ctx.strokeStyle=a.color,ctx.stroke(),ctx.globalAlpha=1},a}function renderParticule(e){for(var t=0;t<e.animatables.length;t++){e.animatables[t].target.draw()}}function animateParticules(e,t){for(var a=createCircle(e,t),n=[],i=0;i<numberOfParticules;i++){n.push(createParticule(e,t))}anime.timeline().add({targets:n,x:function(e){return e.endPos.x},y:function(e){return e.endPos.y},radius:0.1,duration:anime.random(1200,1800),easing:"easeOutExpo",update:renderParticule}).add({targets:a,radius:anime.random(80,160),lineWidth:0,alpha:{value:0,easing:"linear",duration:anime.random(600,800)},duration:anime.random(1200,1800),easing:"easeOutExpo",update:renderParticule,offset:0})}function debounce(e,t){var a;return function(){var n=this,i=arguments;clearTimeout(a),a=setTimeout(function(){e.apply(n,i)},t)}}var canvasEl=document.querySelector(".fireworks");if(canvasEl){var ctx=canvasEl.getContext("2d"),numberOfParticules=30,pointerX=0,pointerY=0,tap="mousedown",colors=["#FF1461","#18FF92","#5A87FF","#FBF38C"],setCanvasSize=debounce(function(){canvasEl.width=2*window.innerWidth,canvasEl.height=2*window.innerHeight,canvasEl.style.width=window.innerWidth+"px",canvasEl.style.height=window.innerHeight+"px",canvasEl.getContext("2d").scale(2,2)},500),render=anime({duration:1/0,update:function(){ctx.clearRect(0,0,canvasEl.width,canvasEl.height)}});document.addEventListener(tap,function(e){"sidebar"!==e.target.id&&"toggle-sidebar"!==e.target.id&&"A"!==e.target.nodeName&&"IMG"!==e.target.nodeName&&(render.play(),updateCoords(e),animateParticules(pointerX,pointerY))},!1),setCanvasSize(),window.addEventListener("resize",setCanvasSize,!1)}"use strict";function updateCoords(e){pointerX=(e.clientX||e.touches[0].clientX)-canvasEl.getBoundingClientRect().left,pointerY=e.clientY||e.touches[0].clientY-canvasEl.getBoundingClientRect().top}function setParticuleDirection(e){var t=anime.random(0,360)*Math.PI/180,a=anime.random(50,180),n=[-1,1][anime.random(0,1)]*a;return{x:e.x+n*Math.cos(t),y:e.y+n*Math.sin(t)}}function createParticule(e,t){var a={};return a.x=e,a.y=t,a.color=colors[anime.random(0,colors.length-1)],a.radius=anime.random(16,32),a.endPos=setParticuleDirection(a),a.draw=function(){ctx.beginPath(),ctx.arc(a.x,a.y,a.radius,0,2*Math.PI,!0),ctx.fillStyle=a.color,ctx.fill()},a}function createCircle(e,t){var a={};return a.x=e,a.y=t,a.color="#F00",a.radius=0.1,a.alpha=0.5,a.lineWidth=6,a.draw=function(){ctx.globalAlpha=a.alpha,ctx.beginPath(),ctx.arc(a.x,a.y,a.radius,0,2*Math.PI,!0),ctx.lineWidth=a.lineWidth,ctx.strokeStyle=a.color,ctx.stroke(),ctx.globalAlpha=1},a}function renderParticule(e){for(var t=0;t<e.animatables.length;t++){e.animatables[t].target.draw()}}function animateParticules(e,t){for(var a=createCircle(e,t),n=[],i=0;i<numberOfParticules;i++){n.push(createParticule(e,t))}anime.timeline().add({targets:n,x:function(e){return e.endPos.x},y:function(e){return e.endPos.y},radius:0.1,duration:anime.random(1200,1800),easing:"easeOutExpo",update:renderParticule}).add({targets:a,radius:anime.random(80,160),lineWidth:0,alpha:{value:0,easing:"linear",duration:anime.random(600,800)},duration:anime.random(1200,1800),easing:"easeOutExpo",update:renderParticule,offset:0})}function debounce(e,t){var a;return function(){var n=this,i=arguments;clearTimeout(a),a=setTimeout(function(){e.apply(n,i)},t)}}var canvasEl=document.querySelector(".fireworks");if(canvasEl){var ctx=canvasEl.getContext("2d"),numberOfParticules=30,pointerX=0,pointerY=0,tap="mousedown",colors=["#FF1461","#18FF92","#5A87FF","#FBF38C"],setCanvasSize=debounce(function(){canvasEl.width=2*window.innerWidth,canvasEl.height=2*window.innerHeight,canvasEl.style.width=window.innerWidth+"px",canvasEl.style.height=window.innerHeight+"px",canvasEl.getContext("2d").scale(2,2)},500),render=anime({duration:1/0,update:function(){ctx.clearRect(0,0,canvasEl.width,canvasEl.height)}});document.addEventListener(tap,function(e){"sidebar"!==e.target.id&&"toggle-sidebar"!==e.target.id&&"A"!==e.target.nodeName&&"IMG"!==e.target.nodeName&&(render.play(),updateCoords(e),animateParticules(pointerX,pointerY))},!1),setCanvasSize(),window.addEventListener("resize",setCanvasSize,!1)}; |
打开themes/next/layout/_layout.swig,在</body>上面写下如下代码:
1 | {% if theme.fireworks %} |
打开主题配置文件,在里面最后写下:
1 | # Fireworks |
添加侧栏推荐阅读
效果图

实现方式
编辑主题配置文件,如下配置即可:
1 | # Blog rolls |
添加站内搜索
安装 hexo-generator-search
1 | npm install hexo-generator-search --save |
安装 hexo-generator-searchdb
1 | npm install hexo-generator-searchdb --save |
编辑主题配置文件,设置Local searchenable为ture
1 | # Local search |
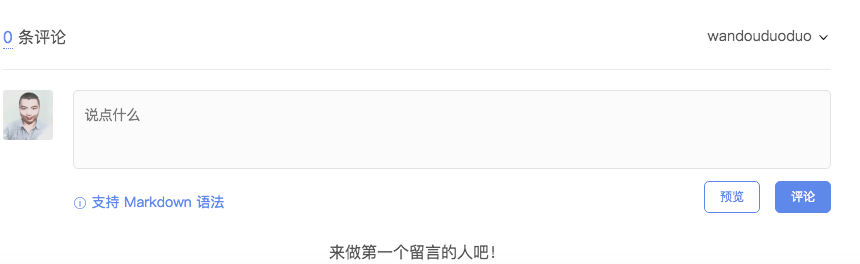
添加评论系统gitalk
效果图
实现方式
在github中注册注册新应用,链接:https://github.com/settings/applications/new
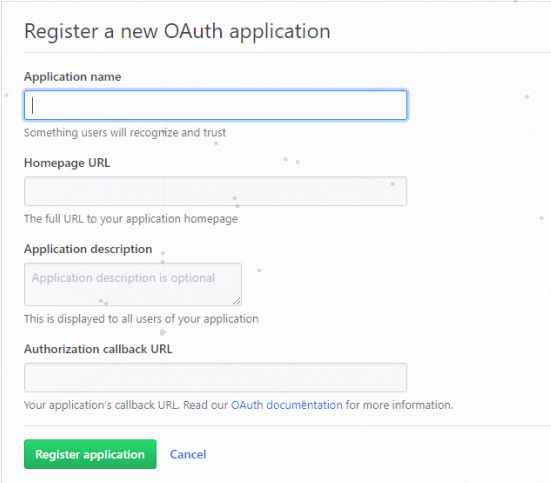
参数说明:
Application name: # 应用名称,随意
Homepage URL: # 网站URL,如https://wandouduoduo.github.io
Application description # 描述,随意
Authorization callback URL:# 网站URL,https://wandouduoduo.github.io
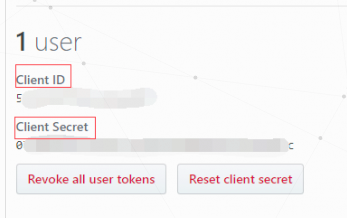
点击注册后,页面跳转如下,其中Client ID和Client Secret在后面的配置中需要用到,到时复制粘贴即可:
在主题配置文件next/_config.yml中添加如下内容
1 | gitalk: |
修改文章链接
Hexo 默认的文章链接形式为 domain/year/month/day/postname ,当我们把文章源文件名改掉之后,链接也会改变,很不友好,并且四级目录,不利于 SEO。
因此,使用 hexo-abbrlink 插件,生成文章的永久链接,后期无论怎么修改也不会改变该链接。
1 | npm install hexo-abbrlink --save |
在站点配置文件 _config.yml 中修改:
1 | permalink: post/:abbrlink.html |
可选择模式有:
- crc16 & hex
- crc16 & dec
- crc32 & hex
- crc32 & dec
寻找图床
当向文章中添加图片时,如果图片来源于网络,那么还比较好办,直接引用那个链接即可,不过也有问题,那就是如果那个链接挂了那么你的图片也就无法显示。另外如果你的图片来源于本地,那么更麻烦了。一种做法是使用第三方服务器,比如七牛,当需要插入图片时,先把图片上传到七牛的服务器然后再使用,我觉得很麻烦。这里选择另外一种方法。
首先修改 _config.yml (在站点目录下) 中 post_asset_folder 字段:
1 | # post_asset_folder: false |
当设置该字段为 true 时,在建立文件时,Hexo 会自动建立一个与文章同名的文件夹,你就可以把与该文章相关的所有资源都放到那个文件夹,这么一来,你就可以很方便的使用资源。例如,文章 post 需要插入图片 test.png 时,就可以使用 [图片上传失败...(image-773548-1546505826136)] 。
问题是这样在本地显示没有问题,但是发布之后就无法显示,使用 hexo-asset-image 插件来解决。
在博客根目录右击打开 git bash ,执行以下命令:
1 | npm install https://github.com/CodeFalling/hexo-asset-image --save |
重新生成之后就可以在你自己的网页上正常显示了。
注意:对于因为 SEO 优化,使用
abbrlink插件修改过文章链接的朋友而言,这种方法还需要进一步修改一下。由于原来的permalink: :year/:month/:day/:title/变成了permalink: post/:abbrlink.html。打开博客根目录下node_modules\hexo-asset-image\index.js,增加一行命令,如下所示:
2
3
4
5
6
> if(config.post_asset_folder){
> var link = data.permalink;
> link = link.replace('.html', '/'); //新增加,针对修改后的 permalink
> var beginPos = getPosition(link, '/', 3) + 1;
>
之后就可以正常显示了,仅供参考。对于修改成其他链接形式的朋友也有一定的参考意义。

